Hints and Tips

Bass is beautiful

How deep do your recorder foundations go? Do you enjoy playing the full range of recorders, or are your eyes still focused on the highest instruments?

Today we’re going to take a look at the bass branch of the recorder family tree. If you already play a bass instrument I hope I’ll have some useful tips to help you improve your skills. And for those who are yet to dip a toe in these deeper waters perhaps I’ll open your eyes to the possibilities and joys of larger recorders.

It’s amazing how the recorder world has expanded its horizons, just within my adult life. When I first attended the Recorder Summer School as a teenage student there were a good number of bass players, but the larger sizes of instrument were still rare - maybe just one or two each of great and contrabass. I was so excited by the sound of these larger recorders in the massed playing sessions I even sent my parents a postcard to tell them all about it!

These days it’s not unusual for us to welcome between 10 and 15 great basses and a similar number of contrabasses to massed playing sessions at the Recorder Summer School. We often have a handful of instruments which are larger still, bringing even greater depth to the music. These wonderfully sonorous instruments offset the potential shrillness of highest recorders, creating a range of tones which would have been unimaginable fifty years ago.

My first foray into the bass recorder world

I first discovered the bass recorder early in my teens. Rummaging in the school music cupboard, I found an old bass recorder with thick orange varnish, a good layer of dust and home to at least one spider. Evidently no one had touched it in years, so I asked my teacher if I could try. She said yes, so I took it home, evicted the spider, washed out the crook and gave it a go. I’d recently begun playing the piano and could read bass clef, so I set about figuring out where the notes lay on the recorder.

We’d been working on James Carey’s Mock Baroque with the school recorder ensemble and presence of the bass meant we now had a full consort and no need for the optional piano part. That made me indispensable and I was hooked!

Several years later, at my first Recorder Summer School I included a PS on that postcard I sent my parents, nonchalantly adding, “Please can I borrow some money to buy a bass recorder”! Cheeky, perhaps, but I did already have the money saved up at home and I couldn’t wait to play an instrument of my own with those rich low notes - far better than the wheezy old school bass!

Why play the bass recorder?

Put simply, bass really is beautiful!

Renaissance bass recorders, where you blow directly into the windway.

The mellow tone of the bass (sometimes also called a basset) is just gorgeous and you’ll find a warm welcome in any recorder ensemble. There’s a great deal of pleasure to be derived from playing the bass line in consort music - you’re helping create the foundations upon which the rest of the music is built. In some music (especially Baroque) you form the musical powerhouse, while in polyphonic music (for example Renaissance consorts) you play an equal role in the interplay between voices. Yes, there are some pieces where the basses draw the short straw and have less to do, but in general composers today understand the need to write interesting parts for everyone - not just the high voices.

If you really want to enjoy the gorgeous tones of the lower recorders it’s becoming more popular to offer eight foot ensemble options at many courses and playing days. This is a group where the highest line is the tenor recorder, with multiple parts extending down to the contrabass and sometimes beyond. Playing the bass recorder in one of these allows you to enjoy these mellow tones from the centre of the ensemble, really feeling you’re part of the action. I conduct such a recorder orchestra (you can learn more about METRO here) and I regularly welcome between 40 and 50 people to our playing days to luxuriate in the lush tones.

The benefits of playing the bass recorder

All recorder players understand the need to work on breath control and tone production. The bass can be a tremendously useful tool here because it makes greater demands on our lungs. Filling the larger bore of the bass with air requires you to breathe more deeply and efficiently to produce a good tone. Even if you can’t manage to play long phrases, the very act of practising the bass recorder will improve the way you use your natural lung capacity, meaning you’ll be able to play further on one breath on the smaller instruments too.

Another benefit of playing the bass is the way it opens up your awareness of other elements of recorder technique. Let’s think about some of these bass specific tips, but remember they’ll help your technique on smaller recorders too.

Top tips for bass players

Breathing and tone

Finding enough air is a challenge for everyone who plays larger recorders. You might assume you need to blow really hard to fill the larger bore of the bass, but you’d be wrong. Yes, a bass will swallow up all the air you can throw at it, but if you overdo things and blow too harshly your tone will be coarse and forced. The principles are just the same as any other size of recorder - make a full, rounded tone, but don’t force things. If breath control and tone production is something you know you need help with, do take a look at the blog I wrote about just this here

You will run out of air!

Unless you’re superhuman you’ll find your lungs run dry more often when playing the bass recorder. Just how soon this happens will depend on your natural lung capacity, and you may need to accept that full four bar phrases just aren’t possible, at least at first.

To combat this, get creative and find more places to breathe. In passages with lots of detached notes you’ll probably be able to take small top ups between notes. In more sustained music it may be necessary to make room to breathe. Use this as an opportunity to reconsider your phrasing.

Whatever you do, you mustn’t compromise your tone or tuning. So often I hear long notes which sag towards the end, losing tone quality and pitch. This simply isn’t acceptable or pleasant to hear. Instead, find somewhere extra to breathe so you can support your tone to the end of every phrase.

If you find yourself playing in an ensemble with several players per part there are other strategies at your disposal. I often ask ensembles to, “make it sound like you’re playing a four bar phrase”. Note the language I used there. I’m not asking them to play four bars without a breath, but instead to give the aural impression they’re doing that. Bass playing is often a team effort. Have a chat with your neighbour and agree where each of you will breathe. Perhaps one could breathe in at the most musical places, while the other takes breaths in really daft, unmusical spots. This way there will be at least one person playing at all times and you will give the impression that you’re collectively playing the full phrase! Talk to any contrabass player and you’ll find they do this all the time.

No chiffing please!

If there’s one thing that’ll spoil an elegant melodic bass line it’s an ugly ‘chiffing’ sound at the start of each note. Bigger sizes of recorder are particularly prone to this - a by-product of the instrument’s larger windway. If you’re not sure what I’m talking about, grab your bass recorder and play some notes with really strong tonguing. Close your eyes and really listen. Do you hear a percussive sound at the beginning of each note? That’s what I mean by chiffing.

As with the breath, it’s easy to assume a bigger recorder needs stronger tonguing. In reality, because bass recorders are so prone to this effect, you need the opposite - gentle tonguing. For high notes this may seem counterintuitive, but as long as your breath is moving quickly enough, even the highest notes don’t need anything more than a gentle tongue stroke.

Yes, there may be pieces where this percussive effect is required or even desirable, but in 99% of cases you should aim to avoid chiffing.

Fragile low notes

All recorders suffer from the same challenges at their extremities. Bass recorder music rarely ventures up to extreme high notes (that’s not really the point of the instrument), but being able to play the lowest notes cleanly and clearly is vital. Gentle tonguing and slower moving air will mostly help you achieve this, but stretching your fingers to the lowest notes can be challenging, especially if you have smaller hands. I wrote about the challenges of extreme low and high notes recently so do check this out if you haven’t already seen it.

Before you begin playing, take a moment to check your bottom joint is in exactly the right position. Scan through the music and see whether you need bottom F or F sharp most often. If you only need one of those notes, why not position the footjoint so you can reach that key most comfortably. If you play one of the square Paetzold bass (or larger) recorders do check your instrument’s joints are firmly pushed together too. Even a minor leak at one of the joints can stop your bass notes singing clearly.

Flexible fingering

As you venture lower in the recorder family you’ll find a need to be more flexible with your fingerings. Standard fingerings, which work so well on higher instruments, may not always be in tune on a bass. For instance, low E flat is often out of tune when played with the standard 0/1-34 fingering. If your instrument came with a fingering chart, check what it recommends for E flat. Many suggest using finger 5 rather than the usual finger 4 on the right hand. It may take a while to adjust to this change but you’ll find it easier to play in tune with others.

Spend some time playing slow scales on your instrument and get to know its foibles. A tuning meter can be useful here as a way of checking which notes are particularly sharp or flat. If you have a smartphone there are several free tuning meter apps available to download. Don’t be afraid to refer to your instrument’s fingering chart to check what the manufacturer recommends. To get used to these different fingerings, find easy tunes and scales you can play to build up the muscle memory.

A handy alternative fingering for top C sharp.

One notable quirk of many bass recorders is a difficulty with top C sharp. Most plastic bass recorders simply won’t play the note with the standard fingering unless you’re able to slur up or down to it. You won’t need this particular note very often, but it pays to be ready when you do. Happily, there’s an alternative fingering which works really well on almost all basses - see the diagram here:

As you can see from the chart, this fingering is a little out of the ordinary, but you’ll be grateful you learnt it when you suddenly need a top C sharp!

A word on clefs

The most common clef for bass recorder music is the bass clef. That seems logical, doesn’t it? Well, yes and no! Bass recorder music is notated with the lowest note appearing just beneath the bottom line of the stave. Look closer though and you’ll see a small 8 just above the clef - that means every note sounds an octave higher than written.

If you were to rewrite the same music at sounding pitch in the treble clef you’d find the lowest note is just five notes beneath Middle C! Compared to a cello, bassoon or tuba (all of which can play notes at least an octave an a half lower still) that barely counts as a bass instrument at all.

Of course notating the music in bass clef makes it easy to read because you’ll encounter relatively few leger lines. For this reason alone it’s worth getting really comfortable with the bass clef. Try to read the notes for what they are rather than relating the pitches back to the treble clef and doing a form of transposition. Not only does it make reading quicker but it also means you’ll always know the name of the note you’re playing at any time.

Although the bass clef is most commonly used for the bass recorder, it can be useful to practise playing it from the treble clef too. Occasionally you’ll find bass recorder parts printed in treble clef and being able to play treble recorder music on the bass can be handy if, for instance, you spontaneously want to try a piece of Renaissance music out an octave lower with an ensemble. This sort of mental flexibility is always worth cultivating, much as it sometimes pays to be able to read treble recorder music an octave higher.

Advice for new bass players

If you fancy having a go on the bass recorder but haven’t yet taken the plunge, the prospect can seem a little daunting. To help you take those first steps here are my thoughts on how you might get started.

Which type of bass recorder?

Unlike the small recorders you probably began with, basses come in many different forms. This can be bewildering at first, so let’s take a look at the options.

Straight or Knick?

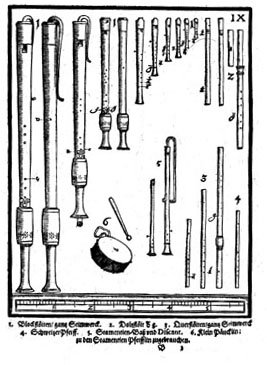
Praetorius’s illustration from Syntagma Musicum which shows bass recorders (3rd and 4th on the top row) plus their larger and smaller siblings.

Look at images of historic instruments and they all tend to be straight. Renaissance basses are generally designed so the player blows directly into the instrument. This offers the benefit of a clear, full tone because your breath has a clear path through the windway to the labium. The disadvantage of this design is you do need quite long arms to reach the fingerholes!

One solution to the long arm problem is to add a crook - a curved pipe which leads to the headjoint, shortening the distance from mouthpiece to fingerholes. Larger renaissance recorders (great basses and lower) used this design and most 18th century bass recorders did too. While this may be more comfortable, the narrowness of the crook can make the sound a little less direct. You may also need to anticipate the beginning of notes as the breath has further to travel before it reaches the labium. That said, some players prefer an instrument with a crook so it’s very much a matter of personal preference.

A new innovation over the last thirty years has been the knick bass. This is fundamentally a straight recorder with an obtuse angle built into the headjoint. You retain the ability to blow directly into the windway, but this bend brings the main body of the recorder closer to you, so pretty well anyone can play one. In recent years this type of bass recorder has become by far the most popular, simply because it offers a great balance between tone and comfort.


Basses by IKEA?

Herbert Paetzold with his family of square recorders.

Another twentieth century innovation has been the development of square basses. They’re quite a common sight on recorder courses these days, but I’ve often heard non-recorder players ask if they were purchased from IKEA! These instruments were first developed by Herbert Paetzold in the 1950s on the principle that if you could have a square wooden organ pipe that sounded like a recorder, surely it must be possible to make a square, wooden recorder. Initially they were made from marine plywood (water resistant and cheaper than exotic hardwoods) but today you can also buy 3D printed models made from a material called Resona. The first of these square recorders were the larger great and contrabass variety, but more recently they’ve become available in bass (and even tenor) sizes too.

Plastic or wood?

This choice may come down to budget. Relatively inexpensive plastic knick instruments are a great way to begin exploring the world of the bass recorder. These begin at around the £200 mark for a Triebert (the Early Music Shop’s own brand model) and increase to £325 for a Yamaha.

If you want to venture into wood prices begin at around £1000 so you’ll probably need to be sure you’re going to stick with the bass before taking the plunge. And that brings me onto another consideration…

How many keys?

For larger recorders to be played comfortably keywork is needed. At its simplest this may just be a single key for the right hand little finger so you can reach bottom F. However, for many people having just one key may makes some of the holes impossible to cover. Most knick basses have at least one extra key for both the left and right hands - a feature which makes the bass playable for pretty well anyone. Many basses require a smaller hand stretch than a tenor recorder.

For this reason alone, a plastic knick instrument is a great place to start your bass recorder career. They produce a good tone, offer a comfortable playing position and are relatively inexpensive compared to wooden or square models. If you already play in an ensemble ask around and you may even find someone who’s upgraded to a wooden instrument and might be willing to loan you their plastic bass to try.

When it comes to wooden recorders, I really would advise you to find a shop where you can try some  instruments. This way you can learn which shape recorders suit you best and understand which ones have keywork that fits your hand shape. If you don’t live near a recorder shop (and sadly few of us do) it’s worth looking out for recorder courses and summer schools as many of them host pop up recorder shops on site.

Getting comfortable

If you’ve figured out which type of bass recorder fits you best you must also consider how to support your instrument. All basses tend to come with a sling supplied and this may be all you require. It hooks onto the back of the instrument so you can suspend the recorder from your body. Most people hang the sling around their neck, but don’t overlook the option of lengthening the strap to stretch it from one shoulder across your body instead. This reduces the strain on your neck and may be more comfortable for long periods of playing.

Another option I sometimes use when sitting is to cross my legs at the ankle. I then rest the bell of my recorder between the bottom of my calves. This takes any strain away from the neck and means the body of the recorder is vertical between my knees. Of course this won’t work if you’re wearing a short or fitted skirt, but it’s a handy solution when wearing trousers!

A bass recorder spike

If you like this idea but don’t find resting the bass on your ankles comfortable, a third solution is to use a spike. These attach to the bottom of your instrument and you adjust the length of the spike to rest it on the floor. The ground takes all the weight and you can play your bass vertically between your knees or to one side if you prefer. Some wooden basses now come supplied with a screw-in spike (the Kung Superio model, for instance) but you can also buy after-market ones which attach via an adhesive Velcro ring stuck to the bottom of your recorder. This is perhaps the most comfortable way to play, but if you like to stand up the spike is unlikely to be long enough unless you rest the end of it on a stool or chair.

Bring your bass to you

My final piece of advice with regards to playing position is as important as your choice of support.

I often see players stretching their chin forward to reach their bass recorder. This puts a tremendous strain on your neck and can cause injury over long periods. The key thing here is to find a playing position which is comfortable and then bring the bass to you. This may be as simple as shortening your sling or moving the bottom of your spike a little closer to your body. Don’t forget too that most knick basses have two points of adjustment in the headjoint. A slight tweak to one or both of them may mean you don’t need to strain or bend your neck awkwardly. The best solution is to sit in front of a mirror and see how your posture looks. If it looks uncomfortable it’ll almost certainly feel uncomfortable after a long playing session!

Don’t forget to consider the height of your seat too. This is particularly pertinent with great and contrabass recorders as they’re often less adjustable than a regular bass. Look around any recorder orchestra and you’ll see many of the contra players bring their own seats or stools to ensure they’re at just the right playing height. Sometimes a couple of chairs can be stacked together to increase your height, but take care as this can also make you less stable.

Books to get your started

Over the years many books devoted to the bass recorder have been published, with several designed for complete beginners. These are the ones I’ve found useful to help my pupils get started over the years….

Denis Bloodworth - The Bass Recorder Handbook (Novello)

The original bass recorder tutor book and still handy today. The music increases in difficulty quite quickly, but it’s packed with helpful information about fingerings so I think it’s still a great addition to any bass player’s library.

Rosemary McGillivray - Mrs McGillivray’s Welcome (Hawthorns Music TT01)

A bass recorder tutor book with a Scottish flavour. Rosemary brought together lots of lovely tunes to get anyone started on the bass recorder. The book begins with a fingering chart, an introduction to the bass clef and some helpful advice, followed by lots of carefully graded tunes to play, many of which share Rosemary’s Scottish heritage. Each time a new fingering is introduced there are plenty of melodies to help you put it into practice. Very well thought out and my top recommendation for new bass players.

Hugh Gorton - Recorder Practice Books 16-23: Grades 1 to 8 (Recorder Music Direct)

A series of graded books, each packed with tunes to get you practising the bass recorder. Each book contains hundreds of melodies, providing you with almost endless repertoire to build your confidence and technique.

Playing the bass with others

One of the main reasons to play the bass recorder is to make music with others as part of an ensemble or orchestra. Playing any new size of recorder with others for the first time can be daunting, but don’t let that put you off. A good place to begin is in the some of the easier ensemble sessions at recorder courses, or at a massed playing session at larger recorder events. You’ll find safety in numbers, meaning you can play as much or as little of the music as you’re able to at first without fear of standing out.

Of course, if you don’t want the pressure of playing with others face to face straight away, don’t forget there are lots of easier consort pieces and video recordings over on my own Consort Downloads page. These give you the chance to make mistakes without feeling you’re holding anyone else up and you can repeat them as often as you wish! Look for anything that’s marked *Easier* as your starting point.

Heading deeper still…

Let’s assume you’ve taken the plunge with the bass recorder and you’re enjoying its rich tones and the chance to be part of the music’s engine room. What’s next?

How about one of the bigger basses?

It’s worth taking a moment to talk about the naming practices for big basses as this isn’t always consistent. You’ll notice among my consorts I use the terms great bass and contrabass. These are the names most commonly used here in Britain, but there are other systems too. As the range of bigger basses gradually expands the British system runs out of options. Below the contrabass we have the subcontrabass (sounding an octave below the great bass) - all logical so far. But when you reach the next member of the family (an octave below the contrabass) you run out of names - should that be the sub-subcontra?

In Europe and the US a different system has been adopted where the contrabass and lower have names which usually relate their size to the smaller types of bass. This is entirely logical, but not consistently used in Britain yet. The clearest way of explaining this is perhaps illustrated by the table below, showing the two naming systems, along with an explanation of their relative pitch. The two largest sizes are still relatively unusual, but they’re gradually increasing in popularity.

The keys of a Paetzold conrabass recorder

Many recorder ensembles now have a great and/or a contrabass player among their number. If you’ve heard them in action you’ll understand how powerful these instruments can be. Of course I don’t mean powerful in terms of loudness, as they’re relatively quiet compared to a tuba! However, even a single great or contra can add to the impact a recorder consort simply through its depth. The best comparison I can make is sound difference when an organ has a pedals - doubling the bass line alone somehow seems to increase the gravitas of the regular bass notes. This is why I was so blown away by that massed playing session at the tender age of 16, even when there were just a couple of contras among a massed group of 140 recorders.

Now buying a great bass or contrabass is an expensive business, so it’s not something you’ll necessarily want to leap into straight away. However, players of big basses are often generous souls and are sometimes willing to allow others to try their instruments if they see the potential to win more folk over to the deep end of the orchestra.

Even if you can’t try an instrument out for yourself, grab every opportunity to sit near the big basses when playing in an ensemble. Just playing the bass among the big boys will give you an aural glimpse of their wonderfully lush tones. I should warn you though, once you’ve dipped your toe into the deep, warm big-bass waters you’ll be spoilt for life - it’s addictive! I personally love playing the great bass in larger ensembles because you’re part of the bass team, but can also find yourself in the enveloped in the midst of the harmonies.

* * *

After our exploration of all things bass, have I tempted you to dip your toe into these deeper waters? Or maybe I’ve made you think about ways you could improve your bass playing?

Either way, I hope you’ve found some useful advice among my words and I’ll leave you with the Berlin Recorder Orchestra playing the Albinoni Adagio almost entirely on low instruments. Turn up the volume and luxuriate for eight minutes in the sound from their forest of big basses!

Survival skills for ensemble playing

When you first start playing in ensembles it can be overwhelming. We all sometimes experience imposter syndrome - the feeling that everyone else in the group is better than you and you really shouldn’t be there. Can I tell you a secret? You’re not alone! In any massed ensemble there will be others who are feeling exactly the same. What are they doing differently? It’s probably just that they’ve developed more survival skills over the years and have learnt how to cope when the music gets tough.

A student on one of my courses asked me about this earlier this year. She felt she needed to learn the art of ‘self rescue’ and that term struck a chord with me. Professional players are expected to be on top of every note we play; able to cope with whatever the music throws at us. But then we’ve spent decades honing our skills to do this. As an amateur musician you no doubt have equivalent skills in whatever you do for a living. For instance, a surgeon knows what to do if a patient unexpectedly goes into cardiac arrest, or a driving instructor can often predict when their student might need an intervention to prevent an accident. If you’re still developing your recorder playing skills there are bound to be moments when you feel overloaded and unable to cope. Don’t give yourself a hard time - instead, realise this is completely normal!

Over the years I’ve met many very intelligent musicians who feel they should be able to do things in music through the power of their intellect - the idea that if I can understand something I should be able to do it! It’s a painful realisation, but sometimes this just isn’t possible. Don’t give yourself a hard time if you fail to achieve perfection. Perfection is something that doesn’t come easily to any human being - even us professionals! Instead, use your intellect to be critical (in a positive way) of your mistakes and try to understand what you can do to improve your playing and make fewer errors further down the line.

My aim today is to share some tips with you which will help when you’re faced with these mental overload moments. Survival techniques which will help you keep afloat and ease your way. These will help you survive a challenging ensemble session unscathed, having learnt from the experience and with a better idea of what you need to practise to find it easier next time.

Before we look at survival skills, lets briefly consider some things you can do before you start playing. These will improve your chances of playing well and getting the most from your rehearsal.

Warm up yourself and your recorder

Doing a few simple stretches to limber up your muscles can be immensely helpful. If your muscles are warm and relaxed you’re much more likely to play well. Think about your overall posture, ensuring you sit well - this’ll help you breathe efficiently and prevent aches and pains caused by slouching. Don’t forget your hands and arms too - recorder playing makes many demands on the delicate structures in your hands, as well as the tendons and muscles in your forearms which control them. An athlete wouldn’t dream off going for a 5k run without warming up first, yet many recorder players think nothing of sitting down for a two hour rehearsal without so much as a single stretch!

The British Association of Performing Arts Medicine have an excellent sheet of warm up exercises which you can print out and keep in your recorder case. There’s a permanent link to these in my Members’ Area for Score Lines subscribers or you can download them from the BAPAM website.

Once you’re warmed up and ready to go, don’t neglect your recorder! Playing in cold churches and village halls often results in fogged up recorders, which sound like you’re playing through cotton wool. This is caused by a build up of condensation in the windway and, ultimately, the swelling of the recorder’s block. The best way to combat this is to get the head joint up to body temperature before you play a single note. Doing this ensures the moisture in your breath is the same temperature as the instrument, so the water doesn’t condense onto the block in droplets.

A simple way is to pop the head joint under your arm for a few minutes - you may have spotted me doing exactly this in some of my consort videos. Smaller instrument head joints can be put into pockets or tucked into your waistband for a similar result. With larger recorders this is less practical so I’ll sometimes use a warm (not hot!) wheat bag (heated gently in the microwave) or a hot water bottle against the head joint. I recently saw this tip shared by the Von Huene recorder workshop in the US which might offer an alternative (albeit somewhat unsightly!) solution.

However you do it, warming up your recorder before playing will avoid the need for perpetual clearing of condensation from the windway and keep your sound clear and beautiful.

Take regular breaks

If you have a long rehearsal to get through be sure to stop at least every hour or so. Get up and walk around to improve your circulation and do some more stretches to loosen the muscles you’ve been working so hard. Chat to a friend about something unrelated to the music, allowing yourself to switch off from the piece you’re studying. You’ll come back refreshed and with improved concentration.

~ ~ ~

Now let’s look at some practical tips to help you keep afloat in ensembles and, where necessary, perform some ‘self rescue’.

Hone your sight reading skills

Being able to read new music swiftly and accurately is an important skill. The ability to efficiently assess and implement musical notation is one that takes time to develop but it’s worth the effort. I wrote a post about this very topic recently so I won’t repeat everything here. If you click here you’ll find masses of tips to help you improve your sight reading and it’ll open in a new tab so you don’t need to lose your place here either!

You don’t need to play every note

It’s easy to get hung up on the need to play every single note. During an initial sight read perfection isn’t the priority. Instead your aim should be to sense of the lie of the land, form a basic understanding of how your part fits into the whole and hopefully spot the bits you need to come back to and practise. Remember too that occasional groups of fast notes (perhaps a couple of semiquavers here and there) are often the least important, musically speaking. They’re probably just the means of travelling between two larger notes but because they’re quick we instinctively feel they must be important. The result is often laboured and slows the music down. Instead, don’t be afraid to slur them together initially if that helps, or even drop a few of them on the floor! I often jokingly say to groups that we can sweep them up later and it’s not a disaster if you don’t play every note on the first reading.

The semiquavers in this piece by Schmelzer are mostly decorative and provide a means from getting one place to another so you can skate over them in sight reading rather than getting bogged down.

Conductors will often do a first read through of a new piece at full speed. This is because we know that taking the music slowly at first will set that slower tempo in the players’ minds and it’ll be all but impossible to speed things up later. Working on things slowly comes after the first read through, after you’ve got the ultimate tempo fixed in your mind. The ultimate tempo may be prove too much of a challenge at first, so try to focus on the main beats rather than every note, aiming to be with at least the first beat of each bar.

Learn to edit on the hoof

When I was studying for A level music we were all allocated another student to accompany. Our task was to attend their instrumental lessons and to play the piano accompaniments for them. I was allocated a baritone singer called Chris who had a penchant for Vaughan Williams. My pianistic skills were rather less developed than my recorder playing so I often felt out of my depth. But playing for Chris’s lessons taught me a vital skill - that of on the spot editing. Faced with a piece in five flats, I knew I couldn’t get to every note initially, so I learnt to leave some of them out! In piano terms this often meant keeping the bassline going at all costs, while thinning down what went on in the right hand (treble) part. By doing this I could provide Chris with some important harmonic support, while keeping the pulse consistent so he could focus on his singing. Over time I gradually added more of the detail back in to give a fuller picture of the music.

In recorder terms this might translate into cutting down some of the whizzy runs. If there’s a long run of semiquavers, perhaps aim initially to play the first of each beat. As you become more familiar with the music you can gradually complete the picture with more notes. The key benefit of developing this skill is the way it allows you to keep up with the pulse at all times - a vital skill for any ensemble player.

Use your conductor, if you have one

As Walter Bergmann was fond of saying, “Your conductor has been paid for. You waste your money if you don’t look at him.” Assuming you have someone standing in front of your group offering a regular beat, you would be wise to make use of them! At the most basic level, a conductor will show you the speed of the music and their beat patterns can be immensely helpful.

If you can ensure the first beat of each bar you play occurs when the conductor’s hand is heading downwards you can be sure you’re in the right place at least once in every bar! If the gestures given by conductors has ever puzzled you do take a look at my blog post, Do you speak the same language as our conductor? Here I explored the gestures we make with our hands, what they mean and much more. A good conductor will convey much more than just the pulse in their gestures so it’s worth learning what some of these mean.

Ensure you can see your conductor

As we get older our eyesight changes and it’s not uncommon to need different strength glasses or contact lenses for music reading. Reading the notes accurately is important, but if you neglect to ensure you can also see your conductor’s beat you’re missing out on some vital information. The most important thing is to be able to at least see the beat in your peripheral vision. It’s surprising how much awareness you can have of your surroundings even while you’re focusing on the music. Your conductor won’t mind if you’re seeing a somewhat fuzzy image of him or her but they will object if you completely ignore them and play out of time! Try adjusting your music stand to different heights until you find a combination that works for you. Many musicians end up buying single vision lenses which are set for the distance of their music stand. This allows you to set your stand at a height where you can easily see both the music and the conductor, even if their movements are a little blurry.

Understand your music

Before you play, glance through the music and look for significant moments, such as key and time signature changes or tempo changes. If you don’t know what the Italian (or maybe French or German) terms mean you could quickly look them up online. Alternatively, look at your conductor and you may well see some clues. I often ask groups what a given term means and there’s almost always a chorus of, “Watch the conductor!” in response. There’s no harm in making a point of learning the meaning of the most common terms and Wikipedia has a great online dictionary of them here.

Read ahead to avoid surprises

One of the most important skills to develop i your sight reading is the ability to read at least a few notes ahead. In slow music you may only need to know where the next couple of notes are leading, but in fast runs it’s helpful to be able to look a few beats ahead. This takes practice, but in time you’ll find it helps remove a lot of the surprises in the music you’re about to play.

Beware of line and page breaks

No matter how good you are at reading ahead, certain danger spots remain - usually points where you move to a new line or page. When you see a line break coming up try to read ahead a little more so you’re ready for what comes next. Such spots are governed by an unwritten law that the trickiest parts of any piece inevitably occur just after a line or page break - just when you’re least expecting them! In old manuscripts you’ll sometimes see a custos (or guard note) written at the end of each line - a warning of the first note you’ll encounter on the next line. There’s no reason why you shouldn’t write such symbols into your own music if that helps you prepare for the line ahead.

The little squiggle at the end of each line in this Sammartini Duo is a custos, indicating the pitch of the first note on the next line.

Navigating your way around bar numbers

The quickest way to restart in the middle off a piece of music is to use bar numbers, or sometimes rehearsal letters. Bar numbers come in different formats - sometimes at the start of each line or perhaps every 5 or 10 bars. It often surprises me how hard musicians find it to navigate around a score so it’s worth having some handy tricks up your sleeve. Just as an air steward warns you the nearest emergency exit can be behind your seat rather than in front of you, sometimes it’s easier too count backwards from a higher bar number rather than on from an earlier one. For instance, bar 88 is closer to 90 than it is to 80.

Rehearsal letters are handy if the music has them, and conductors will often shout them out if they know some of the players have come adrift. These letters (or occasionally numbers) tend to be placed at points in the music where something significant happens - perhaps a double bar line, key change or a moment where the mood or character of the music changes. These can be handy landmarks to check you’re still in the right place.

Learn to count rests efficiently

Apologies if this sounds like teaching grandma to suck eggs, but if this helps one person it’s been worth it! With blocks of rests, count the beats in the bar but with each successive bar replace the number 1 with the number of bars you’ve counted. So, four bars in 3/4 time are counted 123, 223, 323, 423. Counting this way will help you easily keep track of how many bars have passed.

Do you get flummoxed by large blocks of rest? When you pass ten or twenty bars it can be easy to miscount. Don’t be afraid to use your fingers as an aid! Lots of professional musicians do exactly this so you’ll be in good company. You can do so in a subtle way, with your fingers on your lap or your recorder. You can even use a two hand approach, counting each successive ten on one hand and the intervening bars on the other hand.

Finding your spot amid blocks of rests

Blocks of rests can also be problematic if your restarting point occurs in the middle of one, especially when the conductor is keen to get going again. A useful trick is to identify the bar number of when your part resumes (say, bar 72). Once you know this simply count on from the bar number where you’re restarting (say, bar 68) until you get to the point where you need to play again. Using the examples I’ve give you’d count bars 68, 69, 70 and 71 then play in 72. Much simpler and quicker than figuring out how many bars are left to count, especially if you’re faced with a long block of rests.

Don’t play in ‘bingo mode’

This is the term I use for musicians who bury their heads in the music (eyes down, as you would at bingo!) and ignore everything that’s going on around them. When you first start playing in ensembles listening to the other players can be a distraction. Conductors will often implore musicians to listen more carefully but there may well be a small voice in your head saying, “In your dreams, matey!” If this sounds familiar, try instead to listen in a general way rather than focusing on the detail. Especially when playing older music, which is in a style we’re familiar with as listeners, having an overall awareness of the sound can tell you whether you’re in the right place. Violent clashes or completely contradictory rhythms in a piece of Baroque music may well be a sign that you‘ve come adrift from the rest of the ensemble. Yes, it could be that you’re right and everyone else is wrong, but in all likelihood you’re the one who’s out place!

“If all the others are wrong and you alone are right, follow the wrong.”

Walter Bergmann

Don’t always trust your hearing…

Having implored you to listen, there will be times when your hearing won’t be entirely trustworthy. The acoustic qualities of a building can be misleading, especially if it’s a boomy church. By the time a note reaches you from the other side of the room it’s bounced off several walls and the ceiling and this takes time. A half second delay can be catastrophic for coordination, so in this situation be careful to play with your conductor’s beat rather than simply trusting your ears. If everyone does the same, the combined sound reaching your audience will be in time. The same applies if you play multichoir music, where you’ll often be geographically spread around the room.

Take the best seat in the house if you can

When you have the opportunity to play with large groups of players (perhaps a massed playing session at a course or festival) don’t underestimate the effect of where you sit. So often I’ll see the musicians with the least confidence or the poorest hearing sitting right at the back, usually struggling to keep up and hear what’s going on. Instead, grab yourself a seat in the front couple of rows. You’ll find it much easier to hear and see the conductor, keep in touch with the music and you’ll have the support (musical and technical) of those around you. Conductors very rarely bite so you needn’t fear us and, even better, you’ll hear the full tonal range of sound from those behind you!

Listen to the conductor’s advice

My job as a conductor isn’t just to keep everyone in time - I’m responsible for shaping the music too. Along the way conductors will often sneak in snippets of technical advice too - tips about fingerings or perhaps the best articulation to use. Don’t underestimate the power of these tips - listen carefully and you might pick up something that’ll benefit your playing beyond the current rehearsal.

Don’t chat

If your rehearsal is also a chance to see friends try to save your chitchat for the breaks. At the very moment you’re nattering with each other mid-rehearsal you might miss out in a crucial piece of information from the conductor! Likewise, don’t tootle in the rests or when the conductor is talking - it’s very distracting for others.

Always carry a pencil and don’t be afraid to use it!

A pencil can be a very powerful tool for a musician. Jotting in accidentals or highlighting repeats ensures you get those details right next time and frees you up to concentrate on other things. Don’t be precious about writing on music (always in pencil, never pen) - professionals do it all the time and needing to annotate reminders doesn’t make you less of a musician. Remember too to write in your music in such a way that you’ll understand what it means later. It’s no good writing something cryptic in the music which you can’t translate next week - it’s always better to call a spade a spade!

Add some cues to your music

In orchestral music parts often include cue notes - small notes which show what’s going in in other parts of the score. These can be immensely helpful. For instance, during a long block of rests, you’ll hear another line playing a melody at the moment it’s marked in your score, confirming you’re in the right place. Sadly such markings are rarely used in recorder music, but there’s no reason why you can’t add your own. You could take a look at the score and pencil in a snippet of the melody from another part, but even having the words ‘tenor melody’ or ‘dotted rhythm in basses’ jotted in can be reassuring.

Don’t get hung up on trills

Trills often reduce recorder players to quivering wrecks. But in an ensemble situation don’t get too hung up on them, at least at first. If you have the spare mental capacity to put some of them in that’s great, but the main notes are more important, especially when sight reading. When you’re comfortable with the music perhaps start adding the simpler trills, which don’t require complex alternative fingerings. As you gain control of them you can gradually add in the others. If trills make you tremble why not take a look at my recent blog about these decorative delights?

Take the music home to practise if you can

If you know you’re going to be working on a piece over several sessions don’t be afraid to ask to borrow your part between rehearsals. Practising ensemble or orchestra parts can feel unrewarding, especially when faced with a passage of long notes or off beats. However, spending five minutes each day practising that tricky semiquaver run will undoubtedly give you more confidence at the next session.

Don’t worry about nerves and don’t look back!

Playing with a new ensemble or orchestra can be nerve wracking and there’s no shame in having a few butterflies. A little nervous energy will make you concentrate harder and you’ll soon find your feet.

Inevitably you’ll make mistakes (we all do) but when you’re in the middle of a run-through don’t look back at errors and berate yourself for them. Doing so will almost certainly distract you from what’s coming next and cause you to make more mistakes. Instead, try to remember where you went wrong so you can come back and fix it later. I’ll often mark trouble spots with a pencil mark in the margin to remind me to practise those bars at home.

Fake it until you make it

You often hear this phrase used to encourage people to blag their way through a situation, with the idea that if you have enough conviction everyone else will believe you. While this is frequently an oversimplification of what’s required to be successful, there is an element of truth in the saying.

I often hear recorder players being tentative in ensembles, assuming that if they try and hide no one will notice their mistakes. I can understand the logic, but in reality that strategy doesn’t often work! Tentative recorder playing tends to result in weak tone quality, poor intonation because you’re under blowing, and the rhythm often becomes mushy too.

A better approach is to ignore that scared voice in the back if your head and instead play with conviction and positivity. As a result you’re more likely to produce a good tone, be better in tune with others, and play more rhythmically. This positive experience will probably boost your confidence and help you to keep doing the same again. Yes, you’ll still make mistakes, but no one will die as a result and you can easily fix those later!

Don’t forget to breathe

Breathing in is a good thing to do, whether in music or everyday life. It’s easy to get caught up in the moment while wrestling with a difficult passage, only to run out of breath. There’s always somewhere to breathe (even in Bach!) and if the place isn’t obvious just take a breath anyway - the extra oxygen will help you think clearly as well as improving your tone quality.

Don’t be afraid to ask for help

If you lose your place while playing don’t be afraid to make eye contact with your conductor to seek help. If I see someone doggedly look down at their music, wiggling their fingers while I’m conducting I have to assume they’re ok. On the other hand, if a player looks up at me pleadingly I’ll do my best to get them back in, perhaps at their next entry after some rests or by shouting out a rehearsal letter. If I don’t know you’re lost I can’t help you!

Remember, you’re doing this for fun!

Ultimately an amateur musician (by definition) plays for the love of music. Whether you play every note perfectly, or with lots of errors, you should aim to enjoy yourself. Your life doesn’t depend on your playing so don’t let mistakes distract you from the enjoyment your hobby brings.

~ ~ ~

Improving between rehearsals

I’ll finish off with a few quick ideas to help you get more from your ensemble playing.

Pick your level carefully

If you have a choice of different standard ensembles (perhaps at a festival or on a course) don’t be afraid to experiment. Sometimes selecting a session which is well within the boundaries of your technique will help boost your confidence. Equally, a level which stretches you just beyond your comfort zone can be a useful way to improve your survival skills.

Don’t forget that courses and festivals can be a great opportunity to find your feet with a new size of recorder too. For instance if you’ve just started learning the bass recorder you could give it a first outing in a large massed playing session (where there’s safety in numbers) or in an easier session which won’t stretch you beyond your abilities.

Take some recorder lessons

If playing in an ensemble highlights particular weaknesses in your playing don’t be afraid to seek out some lessons. A few sessions with an experienced teacher can be useful to help you understand what you need to work on to improve.

Practise regularly and strategically

It’s not necessary to practise for hours every day, but a few minutes spent on a few technical exercises can pay dividends for your ensemble playing. Maybe some long notes to work on your breathing and tone, and a handful of scales and arpeggios to build your finger technique - all of these will help you cope better in an ensemble situation.

Use ‘virtual’ ensembles to improve your ability to keep up

My playalong consort videos (and there are plenty of others out there too) allow you the opportunity to play ensemble music and they offer the same pressure to keep up as a real ensemble. Even better, you can rewind and repeat them as often as you like without the feeling you’re holding others up!

~ ~ ~

The most important thing you can do to become a better ensemble musician is simply to get out there and play with others. If you wait until you feel you’re ‘good enough’ there’s a danger you’ll perpetually live in fear. Remember, in every ensemble there will be others who are equally worried about getting it wrong. We learn from our mistakes so go ahead and play, safe in the knowledge that every ensemble experience is going to help you develop as a musician.

Do you have ‘self rescue’ strategies I haven’t mentioned?

If there are things you do in rehearsals to help you keep going which I haven’t covered I’d love to hear about them. Strategies which seem obvious to one person may not be instinctive to others and I’d love it if we can all learn from each other. Please do leave a comment below with your favourite musical survival techniques.

Learning to become a musical butterfly

The human brain is a marvellous creation - capable of amazing feats of mental gymnastics. Yet there are moments when somehow our brains spontaneously go off piste, taking us on a completely unintended path. Why is this, and what can we do about it?

In particular I’m thinking today about the challenges of playing different sizes of recorder. As recorder players we’re required to become the musical butterflies, flitting from one size of instrument to the next, with a mix of different fingerings and clefs. I’m willing to bet, like me, you’ve had moments where it all goes wrong and you randomly switch into the wrong fingering, for no apparent reason. Am I right? This is a problem recorder players often fret about, but in my experience, it’s completely normal.

I’ve been teaching for over 30 years and in that time I’ve only encountered one pupil who never experienced this. That child, around the age of 9, began exploring treble fingering after playing the descant for a year or two and, as far as I can recall, never suffered any confusion between the two sets of fingerings. Rest assured, she’s a complete outlier - an exception to the norm. You’d think, as a professional recorder player, I’d be immune to such confusion, wouldn’t you? Oh no, I’ve even been known to occasionally slip into both the wrong fingering and the wrong clef at the same time - double the catastrophe!

Why does this happen? The fundamental problem is the fact that the recorder family commonly uses two distinct sets of fingerings - C and F. This means when you’re playing the descant or tenor, the bottom note (all fingerholes covered) is C, while on the treble and bass the same fingering will elicit an F. We take this for granted, but there could, arguably, have been a better way.

Take the brass family for instance. Every brass instrument with piston valves (trumpet, cornet, euphonium, tuba etc) uses one set of fingerings. If you have lips with sufficient flexibility you could switch from trumpet to tuba in a matter of moments, using precisely the same fingerings. In a brass band everyone even plays in the same clef - including the huge B flat basses. One could argue there was a moment, during the first years of the recorder’s revival in the early 20th century, when such a system could have been implemented for our instrument. I’m certainly not the only person to have considered this idea. Evidently some publishers toyed with the idea of taking this route as I have an old Peters edition of a Telemann Sonata which provides recorder parts in both C and F fingering. One can only assume this experiment wasn’t popular and they reverted to the familiar notation we have today.

Sadly this concept didn’t take off, so instead we give our brains extra exercise by learning multiple sets of fingerings. No doubt this flexibility is wonderful in terms of staving off dementia in later life, but it does create the potential for confusion!

Which fingerings should you start with?

For most of my readers this is somewhat academic as you probably already play both C and F instruments. But if you’re new to the recorder, which should you learn first? For children the answer is usually the descant, purely because the instrument’s size better suits small fingers. For adults though, there’s a strong argument for beginning with the treble. The lower tone is more pleasurable when you’re taking your first steps, and ultimately there’s a far wider range of repertoire for solo treble than descant.

Another good reason for beginning with the treble comes when you take your first steps into ensemble playing. More often than not the descant will play the top line, meaning every mistake feels horribly exposed. Playing the treble puts you in the middle of the ensemble - a much more forgiving spot when you’re finding your feet. Any errors will be better hidden and you can build your confidence more easily.

I can play one set of fingerings, why would I want to learn more?

If you’re at the stage where you’re still playing just one set of fingerings, the thought of learning a second set can be daunting. But it’s definitely worth the effort. Playing more than one size of recorder opens up a wider range of music to you and you’ll be welcomed more enthusiastically into ensembles. Yes, you can play descant and tenor without learning different fingerings, but if you’re to count yourself as a truly rounded recorder player you’d be wise to expand your horizons further.

How to get started with a new set of fingerings

If you want to move from C (descant/tenor) fingerings to F (treble) there are books out there which can help. Brian Bonsor’s tutor book, Enjoy the Recorder, comes in varieties for C or F fingerings, but there’s also a ‘From Descant to Treble’ edition. This begins by helping you over that initial bump, as you realise each familiar note now requires a different fingering. Yes, the book was written with children in mind, but it’s packed with lovely tunes and takes a tone which isn’t childish, so it’s just as good for adults to make this step.

If you wish to make the shift from F fingerings (treble) to C (descant/tenor) you’re not quite so well served with books. However, there’s no reason why you can’t learn the new fingerings on your own. The important thing to remember is you’re not actually learning new fingerings. The patterns you use on all sizes of recorder are fundamentally the same. If you play a scale on one recorder then play the same fingerings on a different size of instrument you’ll it’ll sound just as good - just at a different pitch.

So how to get started?

It’s a good idea to learn at least a handful of scale and arpeggios on the recorder you’re already familiar with. Nothing too complicated, but it’ll help if you can associate the combinations of finger patterns with the dots on the page. For instance, here’s a scale of F major for treble recorder. Below it I’ve added a descant/tenor recorder scale which uses the same fingerings - C major.

Play the one on the instrument you’re familiar with, then play its counterpart on the unfamiliar size of recorder. Let your fingers find their way, using the combinations of finger patterns you already know. That was simple enough, wasn’t it?

Play it again, this time consciously associating the notes on the page with the fingerings you’re using. This is easy because you’re used to running up and down scales in the music you already play. For most stepwise note movements you’ll lift a finger to go up and add a finger to go downwards - all very logical. A greater challenge comes when you need to play music which jumps around as you have to move more fingers.

Choose some anchor notes

Once you progress past simple stepwise movements it’s helpful to have what I call anchor notes. By this I mean a small selection of notes which you have firmly fixed in your mind and can locate quickly. For instance, the bottom note of your chosen recorder (all fingers covered) would be a sensible choice, as you’ll never need to play any lower than this. Then pick a handful of other notes, scattered through the recorder’s range. These would be my suggested anchor notes for treble and descant recorders:

With a confident knowledge of the fingerings required for these notes, you can then work between them. They give you fixed points on the recorder, between which you can navigate. I guess it’s the musical equivalent of sailors navigating with the help of the stars before the invention of a clock designed to help them track longitude. Faced with an unfamiliar melody line, you can use these to figure out where you start and as familiar landmarks along the way.

For instance, take this section from the melody, Daphne:

The first note is one step above one of our anchor notes, so we immediately know to cover one less finger hole. We then have some stepwise movement, where you can use the scale patterns you already know. The jump to high D takes us one step above another anchor note and then into another scale. These fixed points allow us to navigate our way through the melody accurately, and as you learn what the tune sounds like you’re able to judge whether you’re playing the right notes.

Start with simple material

Using this method you won’t be a particularly quick sight reader initially, so it’s really important to select simple material at first. If you jump straight in with a fast, complex piece you’re much more likely to be disheartened and give up.

Don’t look back!

It might be tempting to keep relating your ‘new’ fingerings back to the ones you’re familiar with. For instance thinking something along the lines of, “This is a G on my descant, so it’ll be a C on my treble”. Effectively you’re transposing everything on the spot. Yes, it might work for slow, simple material, but in the longer term it’ll slow you down because you’re forcing your brain through more processes to find each note. I had a pupil who did exactly this on the treble recorder when he first came to me for lessons. Somehow he’d reached grade 8 standard, but his treble sight reading was abysmal and painfully slow. Over time we worked to help him associate the dots on the page directly with the treble fingerings and his sight reading improved enormously. Yes, the process will be slower at first, but you’ll make quicker progress in the longer term.

Random forays into the wrong fingering

As I mentioned earlier, one of the most frustrating aspects of playing two sets of fingerings is that moment when it all goes wrong. It’s not unusual to randomly play a wrong fingering (for instance a descant fingering on treble or vice versa) for a note or two and then switch back again - sometimes without even realising it’s happened!

This may feel like a random act, but there are common trigger notes, so it’s rarely as random as you think. If you’re aware of these danger spots you’ll be better able to realise when it happens and, ultimately, to try and avoid these errors. These are the most common triggers I see:

  • Leaps in the music - As we’ve already seen, playing music which moves by step is pretty straightforward because we’re using familiar scale patterns. Leaps are more challenging when you first switch instruments and, as a result, these are the spots where random acts of fingering often happen. Try to be sensitive to this possibility when playing your least familiar size of recorder.

  • Notes which look like they belong to another instrument - This often applies to high notes. On the treble recorder it’s not uncommon for the music to fly up to two, three or even four leger lines above the stave. If you’re a confident treble player you know this, so when faced with a top C or D on the descant or tenor your brain can unconsciously slip into treble fingering. Equally, low treble notes might subconsciously take you back to the earliest notes you played on the descant or tenor and cause you to play the wrong fingering.

How to spot when you’ve gone off piste

The best way to spot errors in fingering is to listen. For instance, when playing in an ensemble with several players on each part, ask yourself if your notes match those of your neighbour. As Walter Bergmann was fond of saying, “If all the others are wrong and you alone are right, follow the wrong.” This will most often happen when sight reading, or towards the end of a rehearsal when you’re tired and are losing concentration.

Switching to other sizes of recorder

Once you’re fluent in both C and F fingerings you open up a whole world of other possibilities. For instance, the bass recorder uses the same F fingerings as the treble, albeit in bass clef. Playing the bass allows you the chance to be part of the musical foundations in an ensemble and can be very rewarding.

If you’ve ever played another bass clef instrument, adjusting to using your familiar fingerings in bass clef may not cause too many challenges. However, if the clef is totally new to you, I can recommend Mrs McGillivray’s Welcome - a book specifically designed to help you make this switch. It has some useful advice about first steps and is packed full of tunes which progressively expand your range on the bass. Using the same strategy I suggested for the descant/treble switch will work just as well for other bass clef instruments - including the great bass in C.

Venturing further off the beaten track

If you choose to explore more hard core forms of recorder playing, you may be faced with treble recorders in G, voice flutes in D or even more exotic creatures. All of these use the same set of fingerings as your humble descant or treble, but they revolve around a different pitch. For instance the bottom note (all holes covered) of a treble in G is, yes, you’ve guessed it, a G! The voice flute is a tenor recorder sized instrument, but the bottom note is a D instead of C.

For such instruments you could learn to read them as you did with the descant and treble. In practice though, many players (myself included) choose to use tricks to deal with these instruments, especially as they’re used less frequently. For instance, when I play the voice flute (from music in treble clef) I instead pretend the clef is actually a bass clef - as if I’m playing a small bass recorder - and the add three flats to the key signature in my mind. That gets me onto the right fingerings without too much in the way of mental gymnastics and only the accidentals require any adjustment.

There are of course occasions where this doesn’t work. I recently had cause to read a trio sonata with friends which was notated in French Violin Clef. That’s a treble clef which winds around the bottom line of the stave instead of the second line. Effectively, it’s very similar to the bass clef as the bottom line of the stave is G. My usual voice flute trick wouldn’t work because the music was effectively already in bass clef. I could have transposed the music, one note at a time, but my ultimate solution was to imagine I was reading from the alto clef and pretend I was playing a descant recorder! That made my head hurt a little, but it helped us get an idea of the piece was worth exploring further. Once I’d learnt he piece fluently it was no longer an issue.

If you choose to explore viol music you too may encounter C clefs - most likely alto or tenor clef. With these clefs, the centre point of the clef indicates the location of middle C. Often there are tricks you can use to tackle these clefs, much as I do with the voice flute. For instance, tenor clef music can be played on the tenor recorder by reading the dots as if they’re really descant recorder notes!

These examples will be outliers for many recorder players. It may be that you never venture beyond the standard sizes and clefs, and that’s absolutely fine. If you should choose to explore other recorders and clefs just be ready to think laterally to make reading easier.

Practising the switch

Let’s assume you’ve taken that first leap and begun to learn a different set of fingerings or a new clef - how do you practise these new skills?

The most important thing is to do it regularly! As with all new skills, if you don’t nurture them frequently you’ll lose them. This might take the form of practice at home, but don’t overlook ensemble opportunities. If you are a member of a Society of Recorder Players branch (or perhaps a chapter of the American Recorder Society if you live across the pond) take all your recorders with you and switch instruments between pieces of music. Playing with others will help you spot any errors and there’s the comfort of playing with others, many of whom will have been through exactly the same process too.

Switch up the order of your instruments. Don’t get into the habit of always practising your different recorders in the same order when you play at home. Sometimes, change things up - perhaps begin with the treble one day and then select the descant first the following day. This promotes mental flexibility and will develop your ability to play any recorder at will.

Do you have tips and tricks for switching instruments?

If you’ve been playing different sizes of recorder for a while, do you have techniques you find helpful? Maybe you’ve found a surefire way to avoid inadvertent switches, or perhaps you have a great way of reading alto clef? I’d love it if you would share your ideas in the comments below. You may have a method I haven’t considered and it’d be great if we could share our ideas.

Taking the stress out of sight reading

Do you relish first encounters with new music? Or does the thought of sight reading fill you with dread? Assimilating unseen music is an important skill for any musician, whether you’re taking your first steps or you’re an experienced player. The ability to play through fresh repertoire allows us to assess whether we wish to study it further, and in ensembles that fluency of reading is crucial if we’re to be a useful team player.

Think for a moment about what’s required of us when we’re sight reading. You’re reading a written language (much like reading text) and this tells us which notes to play and in what rhythm. Alongside this you have information about whether to play smoothly or detached, how loud or soft, tempo, character and more besides. When you consider the level of multitasking this requires it’s a miracle any of us can get from one end of a new piece to the other without falling over immediately! If sight reading is something you find difficult, don’t give yourself too hard a time - just remember how much you’re trying to do simultaneously.

Having made sight reading sound like an unscalable mountain, my aim today is to help you turn that mountain into a much smaller peak, or maybe a group of smaller hills. Sight reading may come more naturally for some people, but it’s a skill you can definitely improve with practice - just like any other aspect of musicianship.

Let’s take a look at what needs to happen when you’re given a piece to sight read…

One step at a time

It’s easy to panic when faced with a new piece of music but the best strategy is to break the task down into smaller chunks. Let’s consider the most important things to do before you play a single note….

Look at the key signature

Don’t just think to yourself, ‘There are two sharps”, but actually work out which ones they are - F sharp and C sharp. Finger these notes on your recorder so you immediately begin to build some muscle memory.

Check the time signature

How many beats are there in each bar and what sort of beats are they? The top number of the time signature tells you the number of beats, and the bottom number tells you the type. So 3/4 means three crotchet beats in each bar. If you’ve come to music in adulthood and missed out on learning the basics of music theory it’s worth seeking out some tuition to fill the gaps in your knowledge as this’ll help with sight reading too. A local music shop, if you have one near you, is a great place to ask about nearby teachers, and there are many online resources to help you learn about music theory. If this is something you’d like me to cover here, on the Score Lines blog do get in touch or leave a comment below.

Look for accidentals

Glance through the music and look for accidentals. Are there any ‘exotic’ ones which need translating - for instance a G flat is really only an F sharp in disguise. Recognising them in advance will help you play them with greater ease. While you’re at it, look for sharps and flats which repeat later in the bar - you could even pencil them in to remind you!

Check the tempo marking

What speed does the composer want you to play? You may not be able to play it at full speed immediately, but at least try to have any idea what might have been in his or her mind. Wikipedia has a great glossary of musical terms which is worth bookmarking for future reference.

Consider the tempo you’re going to play

You may have to play more slowly than the indicated speed at first, but you do need to have thought about it before you begin! Look through the rhythms to see how wide a range of note values you have. If the music begins with the fastest notes that’s handy, because you get an immediate feel for how whizzy the music will be. If the piece begins with slower notes you’ll need to think through the mathematical relationship between the note values so you understand their relative speeds. Pick a speed where you’ll be able to at least have a stab at the fastest notes, and don’t be afraid to subdivide the longer notes into smaller beats in your head if you need to.

Now look closer at the rhythms

Having taken a wide view of the piece, look a little closer. Look for any funky rhythms which don’t immediately look straightforward. Relate the rhythms to the beats and see if that helps you figure them out. Maybe tap or scat sing the rhythm to yourself initially so you’re not trying to cope with complex rhythms and the fingerings at once. You can also pencil beat numbers into the music if that helps you understand the rhythm more easily.

Check out the rest of the score

Finally, look through at the other markings in the music - articulation (slurs, staccato, accents), dynamics, ornamentation. You may not be able to put all of these in on the first reading, but knowing they’re there is a start. The most important thing is to get the rhythm and pitch first time out - if you can add further refinements that’s a bonus.


A practical example

Let’s put this into practice now and look at a real world example. This short piece comes from a book of practice sight reading pieces. It’s a grade 6 piece, but the processes we’ve just considered can be applied at any level. If you would prefer to try this piece for yourself on descant or tenor recorder you can find a transposed version here.

Click on the music to download printable version

So what jumps off the page at me when I first look at this music?

We have an F sharp in the key signature (E minor, but the name of the key is less important than knowing which sharps to play), with six quaver beats in each bar. The tempo marking, Con moto, means ‘with movement’ so I would probably try to feel two dotted crotchet beats per bar to achieve a sense of flow. If that makes the semiquavers too quick, there’s no reason why you couldn’t feel a quaver beat though.

Glancing through the bars, there are a few accidentals. Checking if any of them repeat during the bar, I see the D sharp needs to be played twice in bar 12. Looking at other details, there are slurs and staccato to be played. The articulation patterns are pretty consistent, with staccato on all of the quavers and most of the semiquavers slurred in twos. Finally, there are some dynamic markings. These tend to be further down my list of priorities as I feel it’s more important to get the notes, rhythms and articulation on a first read through. It all depends on how easily you can cope with everything else so don’t be afraid to prioritise the notes and rhythms if that means you can keep going without hesitating or stopping.

Coping strategies and survival skills

Like everything in life, sight reading is easier if you have some simple strategies in place to help you. If you work through the steps I’ve suggested above that’ll put you on the right path, but here are some handy tips to help you through…

Don’t stop!

I clearly recall my first experience of playing clarinet in the school wind band. We were playing Little Brown Jug by Glenn Miller and I’d only been learning about a year, so I was pretty unsure what to expect. My line was pretty easy, but still I made mistakes and I remember being confused when the band didn’t wait for me as I fumbled my way through! Sight reading an unaccompanied piece is a very forgiving experience - you can stop and start as often as you want. But, the moment when good sight reading skills really come in handy is in an ensemble setting, where the others simply don’t wait for you. Therefore it’s good practice to make yourself keep going at all costs, no matter what you’re sight reading. Drop notes on the floor, but keep the pulse going in your head - you can come back later for a post mortem on what went wrong.

Be methodical and get into a routine

Build good habits. Always working though a mental checklist of the details you need to check before sight reading a piece. If you do this methodically you’ll get into a routine and sight reading will become easier.

Look ahead

When we read words, we gain a sense of the meaning by reading ahead a little, taking in more than one word at a time. This allows us to understand whole sentences, rather than just single words. Music is just the same. Your progress when reading one note at a time will be very slow. Instead, try to look for groups of notes. For instance a dotted crotchet will often be paired with a quaver - think of this like a two syllable word. Beyond that, try to look further on so you see what’s ahead of you and can make sense of whole musical sentences. The faster the music moves, the further you’ll need to look ahead, but don’t forget these wise words from Winston Churchill!

“It is always wise to look ahead, but difficult to look further than you can see.”

Use the notation to help you

Music notation is designed to be helpful. Return to the music example above and look at the beaming. Beams are the horizontal lines which join together groups of shorter notes - quavers for instance. In most music, notes are beamed together in one beat groups. In this example the quavers and semiquavers are always connected together in dotted crotchet length chunks. This helps us see how the notes fit within the framework of the main beats in each bar. This helps you swiftly understand where the beats fall within the bar.

Be prepared for the notes you’ll inevitably forget

When faced with a key signature of multiple flats or sharps, there’ll always be one note you’re bound to forget - usually the last flat or sharp of the key signature. It must be something about the way our brains are wired, but almost every musician I know does this. If you’ve got three sharps, it’ll be the G sharp you’re likely to forget first, while in a key of four flats, you’re likely to overlook the D flats. If you know this you’re in a better position not to fall into the trap!

Focus on rhythm

Rhythm is what keeps music moving along so this should be your first point of focus when sight reading. Yes, aim to play the right notes too, but rhythm is key if you’re to get through the piece.

Don’t worry about perfection

A while ago I wrote a post about the tranny of perfection - the pressure we put on ourselves to be perfect musicians - a task we will always fail at. You can find it here, if you’d like to refresh your memory or read it for the first time. Sight reading will often cause us to fall into the same trap. It’s all too easy to feel you have to get everything perfect first time, but this a desire we’ll rarely fulfil. Instead, keep going, accept you’re going to make mistakes, but remember where they were so you can come back later to correct the errors.

Don’t be afraid to drop notes on the floor

I often jokingly tell ensembles they can drop notes on the floor and we’ll sweep them up later. Sometimes you just have to learn to edit the music on the spot in order to keep it flowing. I learnt this while studying for A level music. I was allocated a singer, whose lessons I was to accompany on the piano. Faced with a Vaughan Williams song with a key of five flats I knew I couldn’t play every note, so I focused on playing the bassline, along with some of the treble notes so my singer had enough accompaniment to carry him along. Second time round, I filled in some of the gaps, once I knew where the music was going.

Use your conductor

If you’re sight reading in an ensemble with a conductor, use them to help you get back on track. You probably won’t have time to eyeball them continuously. But if you’re able to keep their beat in your peripheral vision, you can then check that the first beat of your bars coincides with their downbeats.

Plan ahead and annotate your music

If you’re in an ensemble and you’re given your music while others are still being handed out, use that extra time wisely. Use the steps I listed earlier to prepare and don’t be afraid to pencil helpful notes in your music. Maybe glance through for accidentals and write in ones which reoccur so you don’t forget them first time.

Don’t panic!

Try to keep a clear head, concentrate solely on the task in hand and remember that nothing disastrous will happen if you do make a mistake.

Don’t forget to breathe!

While you’re focusing on getting round the notes, don’t forget to inhale from time to time. You need air to produce a good tone and the oxygen will help your brain to work better too.

You’ve got the basics, now to improve your skills…

Regardless of whether you’re a natural at sight reading, there are lots of things you can do to improve. Here are some practical things that’ll help you hone your skills.

Sight read often

Doing anything regularly will help you improve - conversely, if you only sight read occasionally it’s easy to forget the skills needed. Rummage through your own books of music for pieces you’ve never tried and set yourself the challenge of reading a few unfamiliar lines of music every day. There are graded sight reading books you can buy too and I’ve got some useful resources to share with you too. If you’re just starting out, something simple like a hymn book or a volume of easy folk songs will be useful. Think of this as musical speed dating. You have a short period with each piece of music, where you try to learn as much as possible about it, before moving on to your next date!

Be realistic about the music you choose

Don’t be tempted to select sight reading repertoire which is way beyond your capabilities. If you plan to work on a piece for several weeks or months it doesn’t matter if some of it is initially beyond you. Over time you’ll overcome the technical challenges and learn to play it. To hone your sight reading skills it’s better to choose something a little simpler so you have a sporting chance of maintaining a sense of flow. Over time you’ll be able to move on to more difficult music and stretch yourself further. This is where graded sight reading pieces can be useful, as you’ll be able to see the gradual progression in difficulty.

Practise scales and arpeggios

All music is made up from the patterns we find in scales and arpeggios. By learning to play these fluently, it helps us to recognise them when we see them in music. For grade exams you must memorise them, but I would argue that learning them from music is just as helpful for the purposes of sight reading. In the same way, there are certain combinations of letters which appear frequently in words - once we know this it becomes easier to understand and say words which use them - think of the ‘ough’ in rough, enough, thought and other words. Score Lines subscribers are welcome to download my scale and arpeggio sheets from the Members’ Area on my website. If you’re not a subscriber, why not sign up here for access to lots of exclusive subscriber goodies?

Explore different styles of music

Make yourself sight read music from different genres to widen your experience and learn to cope with unfamiliar patterns. One group I often conduct are great at sight reading early music, but really struggle with jazz based rhythms, purely because they’re less familiar with the style. The more you stretch yourself, the more adaptable you’ll become. Modern music often incorporates more complex rhythms than repertoire from the Renaissance or Baroque, stretching your rhythmic muscles more effectively.

Sight read with others

Playing on your own is enjoyable, but working with others makes you more accountable. Meet up with a friend to play duets, or find an ensemble you can join, where you’ll have to learn to keep going, come what may, when sight reading. If you don’t live near other recorder players, you can always play along with any of my Consort Videos to ensure you keep going!

Sight read on different recorders

If you play several sizes of recorder, make yourself sight read on all of them, perhaps picking a different instrument each day. Otherwise, if you always practise sight reading on the treble, there’s a danger you’ll be a demon reader on that recorder, but may struggle when faced with new music in descant fingering! If you struggle to find sight reading material for some sizes of recorder you’re very welcome to raid the my downloads page for more material.

Use your second chances wisely

When you play a piece for the second time, use that as an opportunity to get more detail and expression into your performance. Maybe pop in more of the dynamics or trills second time round. Be careful not to fall into the trap of overconfidence. On a second reading, subconsciously your brain is saying, “I know this piece a bit now - it’ll be easier this time”, so it’s easy to lose concentration. Conversely, many of the details you stored in short term memory the first time round will have left you because short term memories are stored for only a minute or so in our brains. The result is often a performance which is worse the second time! Don’t get overconfident, but instead concentrate even more to produce a better version second time round.

Looking for practice material?

As I mentioned earlier, there are plenty of sight reading books available to buy, many of them published by the various grade exam boards. There are some great resources available online too. These are the ones I’ve discovered while researching this post but if you know if others please do share them in the comments below.

Practice Sight Reading

A handy website where you can hone your rhythm reading skills at different levels. It’s free to use, but there is an monthly subscription option if you want more bells and whistles.

8 Notes

This site offers sight reading music for a plethora of instruments, including recorder. You can also browse for different styles of music, or even select pieces in particular keys if you want to polish up reading in sharps or flats. Some pieces have accompaniment, to keep you on the straight and narrow, while others are unaccompanied.

Sight Reading Factory

This is an automated site where you can customise the settings, specifying different parameters to help you practise. For instance, you could choose a piece for bass recorder, with a key of two sharps and incorporating triplets.

International Music Score Library Project

IMSLP is a wonderful resource, full of copyright-free music for every instrument you can think of. I often use it to identify fresh consort pieces or repertoire I could arrange for recorders. There’s no reason why you couldn’t use it for sight reading repertoire too though. Searching for ‘1 recorder’ brings up no fewer than 154 pages of suggestions - enough to keep you occupied for several lifetimes!

I hope my thoughts offer you some help with your sight reading. It’s a skill worth practising and polishing as the ability to read fresh music quickly and accurately is so important. If you’ve got your own tips and tricks which you’d like to share please do leave a comment below.

How do you hemiola?

Most recorder players feel at home playing Baroque music. After all, the period between around 1600 and 1750 was the heyday of our instrument, with composers like Handel, Bach and Telemann producing exquisite solo and chamber music for the recorder. However, there’s one rhythmic feature of Baroque music which often creates confusion and concern among recorder players - the hemiola. As we shall see, the hemiola wasn’t restricted to the Baroque period and can be found in repertoire as disparate as Susato and Brahms.

When conducting recorder ensembles, I often ask if everyone knows what a hemiola is when we encounter one. Usually, I see a handful of confident nods around the room, but these are invariably outnumbered by people who either look at me blankly or else suddenly find the floor immensely interesting! My aim today is to help lift the mists of rhythmic confusion, to assist you identifying and playing them with more confidence.

What is a hemiola?

Put simply, it’s a temporary change to the music’s regular rhythmic pattern, changing groups of three beats into groups of two. It’s always simplest to explain such concepts with musical examples so you can actually see them in practice. Take a look at this extract from Lully’s Bourgeois Gentilhomme:

The time signature gives us three beats in each bar. The first beat of the bar is the strongest, so the hierarchy of beats in bar one is strong-weak-weak. The same applies to bar 2. Now look at bars 3 and 4 and see how the rhythm changes. Instead of three crotchet beats we have three minim beats spread over two bars. With a note held across the barline, there’s no way to emphasise the first beat of bar 4, so instead stronger pulses occur every two beats, rather than every three. This is a hemiola.

This particular example is about as simple as it gets with hemiolas - all five voices play the same rhythm so the effect is inescapable. Unfortunately, not all hemiolas are so obvious. If you glance at bars 6 and 7 you’ll see a very similar rhythm, but here the highest voice deviates slightly from the pattern. The overall effect is still a hemiola but slightly less clear cut.

If you find it easier to understand this concept visually I recommend watching this video, created by the Orchestra of the Age of Enlightenment, which uses different examples to help explain the hemiola further - including a juggler! The video also includes the Lully example I showed above, among others.

Why do we have hemiolas?

There are several reasons why a composer might wish to include a hemiola in his or her music - let’s look at them..

To add rhythmic interest

Shifting between groups of two and three beats brings an extra layer of variety and energy to the music. Brahms does this a lot in his music, sometimes bringing hemiola shapes into different parts independently. Recorder players don’t often get to play Brahms, but the same things happens in earlier music too. In The Fairie-round Anthony Holborne shifts endlessly between duple (2) and triple (3) time rhythms. Sometimes the parts shift between meters simultaneously, but often they work independently of each other. sometimes simultaneously. I’ve altered the colour of the notes in this extract to show the triple time rhythms in red, while the duple time rhythms are blue. Click on the image to see it enlarged. If you’ve ever tried to play the Fairie-round you’ll understand why it can be so tricky to put together!

To speed up the musical movement

When you create a hemiola you shift from having a strong pulse every three beats to one every two beats - this gives a sense of the pulse increasing in speed. I’ve added a drum line to the Lully example shown above, placing a drum beat on the stronger pulses. Notice how the speed of the pulse increases when the beat occurs every two beats rather than every three beats.

An aural guide to the music’s phrasing

This is perhaps the most important function for a hemiola, especially in Renaissance and Baroque music. While modern music can be hugely complex, early music frequently contains more consistent and predictable harmonic and rhythmic patterns. That’s not to say it can’t be surprising, but there are melodic and rhythmic features which crop up regularly - for instance trills at cadences in Baroque music.

The hemiola is one such musical feature and composers use it to flag up to the listener that we’re approaching the end of a phrase. Of course, it’s unlikely that you’ll sit there thinking to yourself, “Oh, there’s a hemiola - that must mean it’s the end of a phrase!”. But if you listen to music from this period often enough you’ll subconsciously sense the movement of the rhythm and harmony, feeling a sense of arrival as the music reaches a cadence.

The biggest clue is the rate of change in the harmonies. Very often there will be just one or two chords or harmonies in each bar. At the hemiola this alters, as the harmonies change more swiftly. For instance, listen to this short movement by Gottfried Keller and notice how the rhythm and harmony shifts up a gear just before the cadences. If you’re not sure where the cadences are, listen out for the trills which also occur then. If you’d like to follow the music as you’re listening click here.

Where do hemiolas happen?

Generally hemiolas occur in triple time music - that’s music which has three beats in each bar, say 3/4, 3/2 or 3/8. Let’s look at a few examples.

The first comes from Handel’s Music for the Royal Fireworks - a short extract from the Minuets. The music is in 3/4 time but two bars before the end of the phrase (look out for trills as these often occur at cadence points too) the harmonies change from mostly being one chord per bar to three chords spread over two bars - shown by the boxes.

If you’d like to try this example for yourself you can play among with my consort video of the minuet here.

Minuet from Handel’s Music for the Royal Fireworks - click on the image to see it larger

Now let’s take a look at a hemiola in minim beats - this time taken from Handel’s Recorder Sonata in D minor. If you look at the boxes, you’l notice the first first two beats (box 1) include notes which are predominantly from one chord - A major (A, C sharp and E). The second box contains two different chords, but the final one is once again made up almost entirely of A major.

Handel recorder Sonata in D minor, 2nd movement

As a further example, here’s a short snippet from another of Handel’s recorder sonatas - this time in C major. The time signature is 3/8 - three quaver beats (or one dotted crotchet beat) per bar. In bars 46 and 47 he changes this to have rhythmic groups of two quaver beats. The hemiola is clearest in the recorder part, where the silence on beat one of bar 47 means the emphasis inevitably shifts to the dotted quaver note on the second beat of that bar. This particular movement is littered with hemiolas just like this, introducing a delightful shift from the one in a bar feel elsewhere in the movement. You can listen to the whole movement below.

Handel Recorder Sonata in C major, 2nd movement

Of course, there’s no such thing as a rule that’s never broken, so occasionally you’ll find hemiolas in unexpected time signatures. In La Paix Handel writes in 12/8 time, but still manages to squeeze a hemiola in at the cadences! The music isn’t in triple time, but as the dotted crotchet beats each contain three quavers Handel can group those quavers in twos rather than threes, thus creating a hemiola. Take a look at the top three parts where I’ve added the boxes and you’ll once again see the beats grouped in twos - predominantly either crotchets or as pairs of quavers.

La Paix from Handel’s Music for the Royal Fireworks

Finding the hemiola in its natural habitat

Let’s take a look at the most likely locations for hemiolas…

Cadence points

In Renaissance and Baroque music hemiolas almost always occur immediately before a cadence. These are the points where the music comes to rest momentarily, giving a sense of arrival. If you’re not sure what a cadence is, think of them as the musical equivalent of punctuation in written text. When reading text aloud, the commas and full stops tell you where to take a moment to allow a point to sink in, allowing both you and your listeners a moment to breathe. A cadence has the same purpose, bringing a sense of pause or arrival in the music. Play through any of the examples I’ve shared so far today and you’ll feel this sense of arrival on the note or chord immediately following the hemiola.

When you learn a new piece of music, listen out for these moments of repose as they will guide your phrasing. If the music is in triple time (3/8, 3/4 or 3/2) or in 6/8 you may well find a hemiola in the bar or two immediately preceding these cadence points.

Take a look at this section from Andrew Parcham’s Solo in G, where I’ve marked two hemiolas. Both come at cadence points and if you try playing the top line you’ll no doubt feel that moment of arrival on the note immediately following the hemiola. The composer would almost certainly have expected the performer to add a trill to the final dotted crotchet of each hemiola too - as you can hear in the recording below. The Allegro begins 2 minutes and 27 seconds into the video.

Andrew Parcham Solo in G

Look for trills in Baroque music

As I’ve already mentioned, cadence points are often decorated with trills in Baroque music. These aren’t always marked in the music because composers generally assumed the musicians would be familiar enough with the musical style to know where they should be added. But some did take the trouble to notate them and you’ll often find places where modern editors suggest adding cadential trills. These can be an additional way for you to spot where a hemiola may be lurking.

Look at the whole score

Perhaps the most important piece of advice I can give is to look at the whole score of the music, not just your individual part. Sometimes the hemiolas will be clear as day in your line, but, as we’ve seen in some of the examples I’ve shared, it’s often easier to spot the hemiola when looking at several parts together.

For instance, look at this extract from a Ronde by Tielman Susato. If you’re playing the top line, reading from a single part, you’d be forgiven for missing the hemiola entirely because both bars look like standard 3/2 rhythms. Cast your eye down through the score though and the hemiola becomes much clearer, with a two beat note at either end. Here the top line is simply providing rhythmic contrast, but the overall effect is definitely a hemiola.

Susato Ronde

Look for the rhythmic clues

Very often a hemiola’s effect is amplified by the use of longer notes, which have more weight or aural mass, as I like to call it. Look through any of the examples I’ve shared here and you’ll see time and again, how the composer fills one or two of the hemiola’s three parts with a longer note. This length and weight of these notes makes that section of the hemiola feel more significant, emphasising the fact that he or she is moving the musical stresses away from their usual position on the first beat of the bar.

For example, look at the last few bars of Telemann’s Concerto in C below - at the hemiola you’ll see I’ve circled the dotted crotchets in red. These notes will naturally draw the ear because they’re longer than the other note values within the hemiola. This brings the hemiola effect out effectively, especially if the quavers are kept detached and light.

Telemann Recorder Concerto in C, 4th movement

Look for consistency of rhythm through the texture.

As we’ve already seen, the hemiola rhythm doesn’t always appear in every voice, but often there will be some unanimity. Take a look at this Galliard by Anthony Holborne and you can clearly see a consistency of rhythm between the five voices. Unlike the Lully we looked at first, the parts aren’t entirely unanimous in their rhythm, but in both hemiolas several voices simultaneously have the same rhythm. Looking at the score, it becomes clear there’s a move away from the usual 1 2 3 - 1 2 3 rhythm to a hemiola pattern.

How do I play a hemiola?

Once you’ve identified your hemiola it’s very tempting to emphasise the start of all three sections to hammer the point home. Undoubtedly this will make your hemiola stand out, but it’ll likely lack subtlety!

A better approach is to think in terms of only emphasising one or two sections of the hemiola, which will result in a more subtle, musical effect. For instance, there are two hemiolas in this section of Purcell’s Chaconne from The Gordion Knot Untied. Both begin and end with dotted rhythms, which will naturally attract the most musical weight because of their longer length.

Ordinarily, the first beat of each bar would be the strongest, but here the aural mass of the dotted crotchets moves the emphasis onto the second beat of bars 52 and 59. Now you could also put some added weight onto the last beat of bars 51 and 58 to bring out the middle section of the hemiola. However, the result would be rather heavy and a better approach is to make the middle section of the hemiola light and less important. In this case I’d simply make the crotchets which fall within the second box of each hemiola short and light, creating a sense of lift and bounce. You can hear me putting this approach in practice in my consort video of this piece here.

Let’s take a look at another example, this time from Handel’s Recorder Sonata in B flat.

If you listen to this recording by David Antich you’ll hear the ensemble allow the longer notes to have some weight, but the cellist keeps the crotchets in the bassline light and separated, so as to minimise their importance and help highlight the rhythmic shift of the hemiola.

Looking beyond early music

As I said earlier, hemiolas aren’t restricted to the music of the Renaissance and Baroque - later composers used then too. One of the most famous appears in Leonard Bernsteins’s score for West Side Story and you’ll almost certainly be familiar with the shifting rhthms in America. But had you ever thought of it as a hemiola? You will now! Take a listen - the famous melody line begins around one minute and fifteens seconds into the video below.

Another example occurs in the opening bars of the Concierto de Aranjuez by Joaquin Rodrigo. The solo guitarist opens the whole work with the rhythmic pattern shown below - a clear hemiola in 6/8 time.

As I said at the beginning, Brahms wrote hemiolas too and you’ll find them dotted about endlessly in his music. Very often he chooses to write hemiolas independently in different voices but in this example, from his Intermezzo No.1 for piano, he shows them very clearly together. Normally in 6/8 time the quavers would be grouped in threes (as they are at the beginning of the extract) but on the second system here he writes a series of crotchets - notes worth two quavers - to create a series of hemiolas.

Johannes Brahms Intermezzo No.1 for piano

Are the hemiola mists clearing?

I hope my explanations and all these musical examples have helped you to understand the hemiola better. Don’t be afraid of them, but just be aware of their existence when you meet pieces where the note patterns are grouped in threes. Take every opportunity to consult the score, as you’re more likely to see them there, and don’t hesitate to experiment with your phrasing and articulation in bars you think may be hemiolas. These fascinating rhythmic patterns don’t bite and they can bring more variety, light and shade into your performances.

Finally, if you have a trick for spotting or dealing with hemiolas which I haven’t mentioned please do leave a comment below so we can share our ideas and musical knowledge.