Hints and Tips

Golden rules for recorder players

You like to think of yourself as an individual, don’t you? We all do, but the truth is we’re far more alike than we’re sometimes willing to admit.

When I began the Score Lines blog, just a few weeks ago, I started by sharing Walter Bergmann’s Golden Rules with you. Sadly I never met Walter, but I wouldn’t mind betting he came up with his pithy comments in response to situations he encountered when working with recorder players. Over the last three decades I’ve conducted and coached groups of recorder players of all ages and backgrounds and I too have found similarities in the mistakes they make. As a result there are phrases and tips that I find myself offering on a regular basis. Granted, my ‘golden rules’ may not be as pithy as his, but I wouldn’t mind betting Walter Bergmann would recognise some of the habits I encounter among players today!

Should you worry that you’re making the same mistakes as others? Absolutely not! While we all have different tastes, skills and characters, we are fundamentally made of the same stuff - it’s inevitable we’ll share some of our faults too. I hope there will be at least one nugget here which may help you identify and iron out some of your flaws. Remember though, none of us is perfect so don’t worry if you recognise your own playing in a few or many of my points. One of the best ways we can learn is through our mistakes, so you’re just taking steps towards a new, improved you!

1.      Just wiggle your fingers and blow!

This may seem a very simplistic suggestion, but it reflects two things - our human inability to multitask and the way we tend to overthink what we do.

When working on a tricky piece of music it’s easy to be so focused on just getting your fingers and tongue around the notes that we forget to use sufficient air. As a result our tone quality suffers. I’ll often remind groups to think about their breathing and blowing as well as their fingers and it’s astonishing what a difference it immediately makes to their sound.

This isn’t the only situation where I’ll quote these words though. In lessons I often find pupils are so focused on playing every single note that they get stuck in a spiral of over-cautious, slow playing. Sometimes throw caution to the wind and have a go at that tricky passage up to speed - literally throw your fingers at the notes and see what happens! It’s a really useful way to take stock and discover how far your diligent practising has got you. Some bits will be surprisingly good, while the added burst of speed will reveal the areas which still need more work. Go on, be brave - just wiggle your fingers and blow once in a while!

2.      How long is a minim?

This is a question I often pose to groups and they look at me as though I’m asking the strangest question in the world! Of course, the answer is two beats. But how many beats do you need to be aware of when playing a minim? Then it’s three beats! Confused? Look at this graphic illustration of a minim note within a bar of four beats.

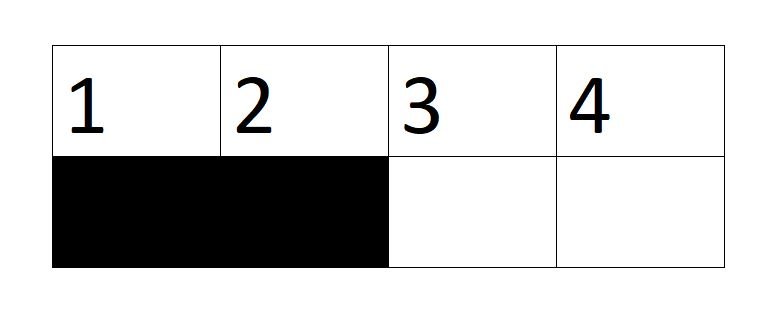
See how the minim begins at the start of beat 1 but doesn’t end until the point where beat 3 begins. Next time you have a long note followed by a rest, think about where the note ends as much as where it begins. Inadvertently shortening a long note can have a detrimental effect on the placing of what follows, especially if this shortening creates a big hole in the music. Equally, there will of course be places where you cannot hold a note absolutely full length because you need to breathe and still be on time for the next note, so this isn’t a ‘one size fits all’ tip.

3.      Very few things in recorder playing can’t be improved by breathing

One of the greatest crimes in recorder playing is under blowing. Scrimping on the air you put through your recorder produces a weedy, undernourished tone and will compromise your intonation too. Remember, recorders are designed to be played with a particular flow of air. If you put less breath than this through your instrument some notes will be flatter than others. Groups I coach never fail to be amazed how much their tuning improves when they simply put use more air. A simple thing but with huge results. It’s easy to get hung up on desperately eking out your supply of air in order to get to the next breath mark. If this results in a weak tone you simply need to find an additional place to breathe.

If in doubt, open your mouth and breathe - your recorder will always thank you for it!

4.      Finish your phrases with finesse

Do you ever have that feeling of “thank heavens I got through that phrase in one piece!”? Of course you do - we all have!

Now think about the final note of that phrase - how did you play it? Was it a much loved and beautifully shaped note, or a huge bump of relief? I bet it was the latter! Next time you’re playing, take care of all your notes - even the last one. Endings matter and a comment I once heard from a Royal Marines bandsman expressed this perfectly - “An audience can forgive anything, as long as you start and finish well and have shiny shoes”! Ok, I know (as did he) that’s a huge simplification, but you get the point. Always care about your music, right up to the last note.

5.      Feel your dots actively

Back in the days when I taught the recorder in schools I’d often ask the children how many beats a dotted crotchet was worth in this rhythm:

A common response was, “One and a bit beats, Miss”. Not quite the precise answer I was hoping for, but it’s an approach I see in adults too. Of course, the correct answer is one and a half beats (unless you’re counting in 6/8, that is) – but how to do you count that half beat?

Most people understand the need to count ‘1, 2 and’ where the and is the quaver that follows the dotted crotchet:

However, in my experience, all too often musicians don’t feel that second beat actively enough. As a result, the quaver occurs in a somewhat nebulous timeframe, rather than precisely a beat and a half after the dotted crotchet. The solution to this problem? Simple – just feel the second beat more actively. Do this and you’ll know exactly where the quaver needs to be placed, then your rhythms will also knit together precisely.

6.      Dotted notes and ties shouldn’t feel nauseous

Those of you who’ve worked with me in person know this is one of my favourite bugbears. If I had a pound for every dotted or tied note which had an ungainly bulge in the middle I’d be a millionaire. The reason this happens is because you’re feeling the rhythm and that is no bad thing. However, take care to feel the dot or the tie in your head, not through your breath. By all means allow your tone to build through a tie or dotted note, but do it with a progressive intensification rather than a nauseous lurch! If you’re not sure whether you have this bad habit, try recording yourself playing music which contains some of these patterns (the voice memo app on a smartphone is handy for this) and you may find it surprisingly revealing….

7.      Always sight read at full speed

This is a piece of advice I was given by a fellow conductor many years ago which is absolutely true. When I run a new piece with a group of musicians I always begin at full speed. Yes, there will be plenty of wrong notes and other blunders, but it plants the correct speed in their minds. First impressions are important - think about the way we judge people based on first encounters. The same applies to music. If you start off slowly your brain will always remember the slower tempo. But if you jump in at full speed, warts and all, you’ll remember that and it’ll it easier to work back up to full tempo as you practise.

8.      Are you watching carefully?

I know I’m not the only conductor who berates groups for not watching the beat closely enough. No doubt the practice of ignoring the conductor has been going on since we moved from thumping a stick on the floor to waving a stick in the air. But do you really need to watch every move the conductor makes? Actually, no!

In an ideal world I’d love it if you watched me like a hawk, taking in every little gesture thoughtfully created to help you play the music. But that sort of attention requires you to all but memorise the music and we all know that’s unlikely to happen. Instead, try putting your music stand at a height where you can see the music clearly but where you can also see your conductor in your peripheral vision. Next time you practise, take moment to focus on your music and note how much of your surroundings you are aware of at the same time. Yes, whatever’s in your peripheral vision isn’t clearly in focus, but trust me, you really don’t need to see me in perfect clarity! Just being aware of the movement of the conductor’s beat will help you keep better in time, and you can look up when necessary to take in other gestures.

 9.      Breathe in sympathy with the music

Imagine you’re about to play a fast piece of music – what body language clues do you expect to receive from whoever’s leading your ensemble? Almost certainly, a brisk lift of their instrument and a speedy intake of breath. How about if they move gently and take a leisurely breath in? I’m willing to bet you’d expect a slower tempo.

The way we breath when playing has a huge influence on our playing and the musicians with whom we play. Next time you practise, try taking different speed breaths and note how it encourages you to play the music differently. A slow breath implies a relaxed tempo, while a sharp intake of breath suggests something more dynamic. While you’re at it, do breathe in time with the pulse during the music and you’ll almost certainly play more rhythmically.

10.  Don’t fight your recorder!

All too often I hear recorder players doing battle with their instrument.

On a Baroque recorder your bottom notes will naturally be soft, while the higher registers are louder and more piercing. You want stronger bottom notes? Try a Renaissance recorder, whose bore is wider at the bottom, resulting in fruitier low notes. The downside? You may have to sacrifice the ease of the highest notes. Every recorder is a compromise and this is the price we pay for choosing an instrument which hasn’t evolved significantly since about 1750.

Of course, not all composers understand this. We’ve all come across pieces where a bottom note is marked forte or a composer who demands a pianissimo top note. Instead of trying to force your instrument to achieve the impossible, I would encourage you to be sympathetic to your recorder and allow it to sing to its best ability.

Let me share a practical example with you….

Last week I rehearsed my recorder orchestra in a piece which ended with a piano low F played by the contrabasses, while the rest of the orchestra followed on with a chord above that. Players of big basses spend a lot of money to buy their instruments – effectively paying for the low notes other recorders cannot reach. Of course you want value for money, so I wasn’t surprised when my contra section gave that bottom F all they had, going for a full on fruity sound! Was it a pleasant effect? Frankly, no! Instead I encouraged them to soften their faces and throats, breathe deeply and blow in a gentle, relaxed way. What a difference! Suddenly we had a beautiful, warm but piano tone which didn’t set my teeth on edge. Even better, the instinctive reaction of the rest of the orchestra and their murmurs of approval showed they liked it too! As soon as the contras played their bottom F in its sweet spot, rather than trying to make it bigger than was practically possible, the effect was glorious.

My advice to you is to think about what is realistic and pleasurable when playing the recorder. Yes, you may not achieve the dynamics the composer demands, but the result will be much more enjoyable and your notes will sound better. Use a slower, gentle airflow for low notes to make a sweet, relaxed sound. For higher ranges plan ahead and be ready to use faster moving breath so your notes speak with ease. Play with sympathy for your instrument (and remember different makes and models of recorder have different needs) and you’ll play more beautifully.

11.  Don’t be afraid of high notes

My clarinet teacher used to tell me that high notes need to be tamed in the same way you would train an over-eager dog. Rather than being hesitant, showing your fear, you need to be confident and assertive, showing them who’s in charge! The same principle applies to the recorder.

How often do you see a top note looming on the musical horizon and feel a cold stab of dread in your heart? What happens when you get to the note? I imagine you may well tense up, blow tentatively, tongue the note for all you’re worth and jam your left thumbnail into the hole in desperation. The result? If you’re lucky, a tight, squeezed tone and if you’re not, a complete disaster!

Here’s a better strategy….

Breath deeply beforehand, so you have plenty of fuel to create the faster airflow high notes demand. Think about just how fast the air needs to go before you hit the note – plan ahead. Tongue gently – high notes are far more likely to split if you hammer them out with force. Finally, think about your left thumb position. Open the thumbhole a small amount. Open it too far and the note will fail entirely, but close it too much and you’ll get a rough undertone. Better still, regularly practise plucking high notes out of nowhere – that way you’ll learn the needs of your instruments so you can find them with ease in the field.

12.  Make your conductor happy by using your pencil!

If there’s a sound that makes me happy it’s the clink of a pencil being placed back on a music stand. Does this make me strange? Well, that’s for you to decide! Seriously though, there’s absolutely no shame in writing on your music if it helps you play better.

I write things on my music all the time. I know from experience that if I don’t, I’ll forget crucial details and will make mistakes. My rule of thumb is if I’ve made a mistake more than once I need to write a reminder in my music. Doing so ensures I don’t have to think so hard about the basics (accidentals which continue through the bar, the breakdown of tricky rhythms etc.) and instead I can focus on real music making.

I have a fascination about the way the human brain works and have recently read several books on the subject. It surprised me to learn that our short term memory is a minute or less. That means if you make a mistake while practising but then carry on to the end of the piece you may well have forgotten what that mistake was by the time you come to write a reminder in your music. Instead, stop straight away and make a note of that missed accidental, or incorrect rhythm.

One of the ways we move patterns and actions from short term to long term memory is by repeating them. If you continually come back to that same accidental and play it wrong you are repeating and compounding the error. After a while the mistake gets stored in long term memory. We all know from painful experience that bad habits are harder to shift than creating new good habits. Unlearning an error is more difficult than learning it correctly from the start as you are having to overwrite an incorrect memory with a new correct one. If my audience includes any neurologists you may well be cursing me for oversimplifying this complex subject by now. However, if my explanation helps even one musician play more right notes I make no apology!

While we’re here, please don’t write cryptic symbols in your music. Instead use words or symbols you’ll still understand in a month’s time. I once asked a pupil of mine what the exclamation mark written above a note in her score meant and she had to admit she couldn’t remember! If she’d used an accidental or a word whose meaning was obvious she’d have avoided making the same error over and over again.


So there you have a dozen of the things I find myself saying to recorder players everywhere on a regular basis. No doubt others will spring to mind as soon as I publish this week’s blog, but I hope these tips will at least make you think and help you play better.

Do you have any handy hints and tips you’d like to share with our recorder community? It doesn’t matter how large or small they are - if they help you they’ll help others too! Please do share your thoughts in the comment below – let’s see if we can all learn from each other.  

Decisions, decisions…

Musical notation comes in incredibly varied forms. Most music composed since the mid-19th century contains clear instructions from the composer, showing us where he or she would like us to begin our interpretation. That’s not to say we don’t still have musical choices to make, but generally the music gives us a clear starting point.

Now look back in time. As we travel back through the musical periods, composers give us fewer clues, expecting us to already have sufficient knowledge of the appropriate musical style to be able to make the necessary choices. This can be bewildering – so many decisions to make, but where to begin?!

Handel’s manuscript of his Recorder Sonata in F major

How should we make these decisions?

In an ideal world you’d go back to some original sources, to learn directly from composers and writers of the period.  A great starting point for this is On Playing the Flute by Johann Joachim Quantz – a book I’ve talked about before. If you want a glimpse into the 18th century musical mind and an opportunity to pick up lots of helpful tips I strongly recommend you purchase a copy of this iconic book. Quantz helpfully breaks his advice down into user-friendly chunks, so it’s easy to dip in to find the information you need.

For the purposes of this blog post I’m going to concentrate on Baroque music, but many of the same principles can be also used in other repertoire. To illustrate my ideas I’ll use the first two movements of Handel’s Recorder Sonata in F – a piece of music I imagine many of you will already be familiar with. To make life easier, below you’ll find buttons which link to two different editions of this famous sonata.

The first is a facsimile of the sonata from a collection published by John Walsh in London in 1732. The notation is very clear and typical of the type of edition with which Handel’s contemporaries would have been familiar. The music includes only the recorder part and bassline, along with figured bass. Using the bassline and figures the harpsichordist is expected to improvise a performance, allowing complete autonomy over the style and mood of the accompaniment. As a recorder player, being able to see the shape of the bassline is also helpful as you can immediately see the conversation between the two voices.

Secondly, we have a modern edition of the piece, which includes a full realisation of the figured bass – probably the type of edition you’ll be more familiar with.

Taking your first steps on the road to an authentic Baroque style

I’m going to break down the elements of Baroque style, although these inevitably overlap in places. As you gain in confidence and experience you’ll be better able to assess some of these elements ‘on the hoof’, as you sightread. Of course, no one can be expected to form a final interpretation of any piece while sight reading, so don’t worry if at first all you can do is get around the notes and rhythms. As you get to know the music better, try to use some of the self-awareness techniques I discussed in my last blog post to think about the musical possibilities.

Let’s take a look at some of the elements you should think about as you get to know the music better…

Select your tempo

This really needs to be your starting point. Look at the composer’s tempo markings and identify what they mean. If the markings are in a language you don’t speak, go and look them up! Wikipedia has a pretty comprehensive glossary of musical terms here which you might want to bookmark.

Now play the music at what you think is an appropriate speed and consider what mood or character the composer is trying to conjure up. For me, the opening Larghetto of the Handel is quite noble. The lines emerge gradually, building from a simple beginning, blossoming into more expansive shapes later. In contrast, the Allegro is a much livelier, skittish number. It seems to be itching to have some fun at the beginning, with energetic jumps and repetitions, finally leaping properly into action with the semiquavers at bar 6.

Assessing the mood and character this way will influence your choices later. Don’t worry if you can’t play everything in a polished way at this stage – it’s more a matter of deciding what character you want to project, even if technical limitations get in your way at first!

While you’re here, bear in mind what sort of key you’re playing in.  Major keys tend to be sunnier and more joyful, while minors are darker and more sonorous. That too may affect the way you decide to play the music, especially if the key changes en-route through the piece.

The implications of time signatures

Now check your time signature. How many beats are there in each bar and how do those beats break down? For instance, a piece in compound time (where the main beats subdivide into three rather than two notes – this sonata’s final 12/8 Allegro for instance) will perhaps have a more rustic, country dance-like feel than a movement in 4/4.

By the time we reach the Baroque period, composers habitually use time signatures to show how the music is constructed – unlike the freer, unbarred music of the Renaissance. In the Baroque style there is a clear sense of hierarchy within the beats of each bar - the first of which is always the strongest. Bear this in mind as you play, as using an equal weight on every beat of each bar will quickly become very repetitive. Try playing the first few bars of the Larghetto with an equal weight on every beat. Then have another go with a gentle emphasis on the first beat of the bar, while making beats 2 and 3 less insistent. Note now this helps the music flow more elegantly.

In time signatures with more beats per bar things become a touch more complex. In four, for instance, you could illustrate the hierarchy of the beats graphically like this…

Beats 1 and 3 are subtly different, but definitely the most important as they begin each half of the bar, with beat 1 being the strongest. Next in the pecking order comes beat 4 – this is because it’s the one that leads us onwards into the next bar. Finally, the runt of the litter is beat 2, the weakest part of the bar. Awareness of this musical hierarchy can help you bring more subtlety to your playing.

Turning notes into musical sentences

Now turn your mind to the phrasing of the music. Compare music to the spoken word. Musical phrases, like spoken sentences need ebb and flow, rather than a continuous, shapeless stream of notes. In text we have punctuation to help us create sense from the words, but in Baroque repertoire we have to figure out the musical sentences for ourselves.

Baroque music is often quite straightforward in its shaping, with phrases tending to come in multiples of 2, 4 or 8 bars – think of it like a poem with a regular number of syllables in each line. With this in mind, look at the music and see if this reveals natural places to breathe. If the music begins with an anacrusis (an upbeat of some sort, perhaps a single beat or half beat note) subsequent phrases will almost certainly follow the same pattern.

For instance in the Larghetto, the recorder part begins with two crotchet beats. If you look at this passage, you can see I’ve added a breath mark before each of these two beat patterns. If you look at one of the scores, you’ll see the bassline also begins many phrases with the same two beat pattern.

In contrast, the Allegro has a single quaver anacrusis and this pattern also repeats throughout the movement.

All the breath marks in this section come before a quaver upbeat

Naturally, there will be instances where the composer changes things up to add variety, so don’t be afraid to try different approaches and see which you like best. Sometimes the phrasing becomes more obvious when you play the music with its accompaniment – hearing the harmony beneath your line can clarify things.

Adding light and shade through articulation

In modern music we expect composers to tell us precisely how they wish us to articulate their notes, through slurs, staccato, accents and the like. Baroque performers, by contrast, were expected to have an innate understanding of the prevailing musical style and to shape their performances accordingly. Obviously, we can’t travel back in time to talk to 18th century musicians, so this is where resources such as Quantz’s book come in handy. If you listen to older performances of Baroque music you’ll often hear lush, heavy string playing, which owes more to the Romantic period than authentic playing practice.

A lush, romantic interpretation of Bach’s Air from his Third Orchestral Suite by Herbert von Karajan and the Berlin Philharmonic

With the early music revival of the 1960s performers began looking more closely at the practices of the period, introducing greater light and shade into their interpretations, alongside the use of original instruments, or faithful modern copies of period instruments. Much of the variety you find in these performances of Baroque music is created through the use of articulation.

A historically aware performance of the same piece by the Academy of Ancient Music

With a blank canvas to work from (Baroque composers rarely give more than the occasional slur or staccato mark) the possibilities can seem overwhelming. I have a few simple guidelines which I hope will help you come up with your own personal interpretation. I hesitate to call these ‘rules’ as that suggests they are things you must do. Instead, think of them as a starting point and remember too that rules are made to be broken!

Here are the basics ideas I suggest to my students when they’re trying to find a Baroque style, along with some examples from the first two movements of the Handel Sonata:

Slow movements will often be more suited to legato playing than fast ones. But that’s not to say everything should be silky smooth. Try making weaker beats in the bar (see my earlier comments about their hierarchy) a little lighter, and less emphasised to bring in light and shade. Likewise, upbeat notes may want to be lighter/shorter so they don’t become too heavy and distract from the stronger beats.

In fast movements look at the prevailing note values. As a starting point, make the fastest notes mostly smooth (semiquavers in the Handel Allegro), while the second fastest note values (quavers in this case) can be more detached.

The first section of the Handel Allegro with staccato marks to show where I would lighten the quavers. Notice how I choose to play some of the stepwise quavers smoothly.

Now look at the melodic shapes within these detached quaver passages. Leaping notes and repeated notes will often need to be the shortest, while stepwise movement might be better played more smoothly. It’s not a one size fits all rule, but a mere starting point. Notice too, how I use staccato less often on the first beat of the bar, so as to create that sense of hierarchy between the beats.

Be aware of times when the tonality changes between major and minor. A major section may feel absolutely right played in a staccato style, while a similar shape in a minor key might benefit from a more legato approach.

You’ll notice I’ve made no reference to dynamics so far. This is largely because of the recorder’s limited dynamic range. The concept of playing pianissimo or fortissimo is not really relevant to the recorder, but that’s not to say dynamics are impossible. Instead I would suggest you focus more on using a variety of articulation (staccato, legato, accents, slurs) to add variety to your performances.

To add dynamic rise and fall think instead about using the recorder’s natural dynamic range (stronger on high notes, weaker at the bottom) to create a sense of line and shape. For instance, in the sound clip below, the dynamic of the music increases and decreases naturally as the musical line climbs and descends.

To slur or not to slur?

As I’ve already mentioned, few Baroque composers offer much in the way of slurs in their music. Two notable exceptions among recorder composers are Georg Philipp Telemann and Francesco Barsanti. Both were recorder players themselves and therefore knew what best suited the instrument. This means the slurs we encounter in their music work well and can offer ideas we can use elsewhere. For example, here are two snippets by Barsanti and Telemann.

An excerpt from Barsanti’s Sonata in D minor, where he slurs three stepwise notes together within a group of four

In his Sonata in C major, from Der getreue Musik-Meister, Telemann chose to slur groups of six notes together, crossing between neighbouring beats

Sometimes adding slurs into the music can help with faster passages, especially if you’re not yet fluent with double tonguing. A few carefully placed slurs might give your tongue a little breathing space, but I would advise against using them all over the place simply as an excuse not to improve your tonguing!

Instead, look for patterns within the music which might benefit from slurs to add greater variety and interest. For instance, you could use Barsanti’s 1 tongued, 3 slurred articulation pattern, here in the Handel Allegro. Note how the pattern changes to 3 slurred and 1 tongued from the bar 23 to suit the changing melodic shape.

If you choose this route, try to be consistent, adding the same slurs whenever a particular melodic shape appears in the movement. That will bring an added feeling of cohesiveness and make their addition feel like a musical choice rather than something random!

Incidentally, a two notes slurred, two tongued pattern is almost non-existent in Baroque music. It’s much more typical of the Classical period, appearing in music by Mozart and his contemporaries. It may seem an easy choice, but often 3+1 or 1+3 will often be more appropriate, depending on the note patterns you’re playing.

Taking the terror out of trills

The subject of ornamentation can fill an entire book, so I don’t plan to cover it in too much detail here. However, I know trills often strike fear into the hearts of recorder players, especially when your main focus is just getting on top of the notes! However, I’d like to offer a few simple words of advice which may calm your quaking nerves.

What is the purpose of a trill in Baroque music?

In many types of music, trills serve a purely decorative purpose, but in the Baroque they have a different function. You may wonder why teachers and conductors insist on that Baroque trills should start from the upper note. This isn’t just because we’re contrary, but instead it performs an important harmonic function. The whole purpose of a Baroque trill is to create a moment of tension, followed by a feeling of release. The upper note of a trill almost always clashes with the accompanying harmony, creating a discord and a sense of tension. At the moment when your fingers move on, and you begin to wiggle between the two notes of the trill that tension is released.

A strategy for Baroque trills

For many recorder players, trills feel like a distraction, sent to cause them pain and panic. Instead of panicking about their busy-ness I would focus on that upper note. By spending a little longer on the upper note your trills will sound more expressive. It also means you don’t need to wiggle your fingers for quite so long – I think that’s what you call a win-win situation! It’s important to remember that the crucial upper note must begin on the beat and not before. If you start it early (perhaps to try and buy yourself some more time) it’ll be over before the chord it is designed to clash with is played, so the trill loses its entire reason for being.

Finally, don’t feel your trills need to be metronomic and the really fast throughout - this is especially important in slow movements. In slower music you can start to wiggle lazily and gradually wind the speed up. Once again, you reduce the number of wiggles required and your fingers don’t have to move quickly for so long. More importantly, your trills will sound more expressive and musical – another double bonus!

Where next?

I have three parting thoughts which will help you put some of my advice into practice.

The first is to listen to other performers playing Baroque music. Seek out good performers and really listen to how they tackle this repertoire.  Ask yourself about the speeds they’ve chosen and where they vary their articulation. How do they phrase the music? How do they create light and shade? Look for performances by respected professional players and remember you don’t just need to focus on recorder music. For instance, listen to the Bach Brandenburg Concertos and note how the string players vary their articulation and phrasing just as recorder players do. Yes, their playing technique is different, but the basics of Baroque style apply to any instrument.

The final movement of Bach’s fourth Brandenburg Concerto. Note how the strings and recorders all vary their articulation to bring the music to life.

Secondly, take risks and experiment! Take a single movement (I would suggest something simple at first) and spend time exploring several different ways to phrase the music. Try the articulation ‘rules’ I’ve suggested then play the music again, breaking the rules. Maybe make copies of your chosen piece and mark them up with different combinations of articulation and phrasing. Do this as many times as you like, but the crucial thing is to be creative and explore all the possibilities. You’ll discover some versions you hate and some you love, but most importantly it’ll get you thinking in a different way. Don’t be afraid to make mistakes – you learn just as much from these as from your successes.

Finally, be bold! I frequently find myself telling students to be more extreme in their creative decisions. It’s too easy to be half hearted in your approach for fear of going over the top and sounding too extreme. In my experience, people are often far too cautious, resulting in bland performances which lack musical interest. Recently I’ve asked pupils to play to me as I listen with a pencil and a copy of their music to hand. As a listener I should be able to understand their intent clearly enough that I can annotate my copy of the music with their phrasing, articulation marks and dynamic shapes simply by listening. You could even record yourself playing and then try this exercise – you might find it very revealing!


I’d love to hear your own tips for creating interesting performances. Or perhaps you’ve been to a concert which really stuck in your memory because it was so dynamic and exciting? What did you learn from the experience and how has it helped you become a better player? Do leave a comment below so we can all share our ideas.

Music making is an endlessly fascinating subject and you can look forward to a lifetime of creative experimentation if you keep an open mind!


Don’t forget, I’m still creating new Recorder Consort Videos, plus regular duets and trios-minus one. Recent additions have included a Fughetta by Glen Shannon, excerpts from Henry Purcell’s The Fairy Queen and a two voice Fantasia by Michael East. You can find all of them over on my Downloads page.

Cracking the code

Knowledge is a funny old thing. Once you learn about a subject you forget there was a time when you lacked this knowledge. Equally, it’s all too easy to remain unaware of the things you don’t yet know!

Through my work with adult recorder players I encounter amateur musicians from all walks of life, many of whom are very knowledgeable about a myriad of subjects. Over the years they’ve picked up snippets of useful information about the music they play, but this knowledge is often peppered with holes. Whereas children have no fear of asking questions, adults will often hold back for fear of looking foolish, even if this might help fill some gaps in their understanding. The irony is, other people in the room will almost certainly also be thinking, “I wonder what X, Y or Z means” but will also be too afraid to ask the question!

A recent conversation with an adult pupil made me think about all the little pieces of information which are handy to know when tackling Renaissance music. I’m as guilty as any teacher of sometimes assuming a level of knowledge among those I work with, forgetting to mention details which seem obvious to me. Today’s blog post is my attempt to help you fill in some of these blanks in your knowledge. If even just one of the things I cover here brings you an ‘aha’ moment, it will have been worth it!

To illustrate the subject, my examples come from the Victoria Motet I recorded and shared a few weeks ago, but all of the topics here are applicable to other pieces of Renaissance music. When you’ve finished reading, why not dig out another piece from the period and see which of them you find there?

Let’s begin with the basics….

What is Renaissance music?

Fundamentally, it’s music composed between roughly 1400 and 1600. The transition between musical styles is never an overnight change, but a gradual shift. There were composers at either end of the Renaissance who were either still composing old fashioned music, which owed more to the medieval period, or forward thinkers, leaning towards the Baroque style before it became mainstream. If I mention the names Gabrieli, Palestrina, Lassus, Tallis and Byrd I’m sure you’ll all be nodding in recognition, having played music by at least one of them.

For the purposes of this blog post I’ll help you understand the notation in modern editions of Renaissance music. Learning to play from facsimiles of old manuscripts can be fascinating, as it reveals the sort of notation Renaissance composers would have been familiar with. If I were to cover that here too though we’d be looking at an article of epic proportions. Instead I’ll limit the scope to modern editions of the sort offered by publishing houses like London Pro Musica and many others.

An example of Byrd’s music in its original published notation

What’s in a name?

These days the voices in a piece of recorder music are generally labelled with instrument names – for instance tenor recorder, great bass recorder etc. This is because most music from the Baroque period onwards was composed with a specific instrumentation in mind. Previously this was a more flexible concept. For instance a Renaissance canzon could be played by a variety of different consorts - viols, recorders, cornetts and sackbuts or even a mixture of these. As a result composers tended to use a more general naming procedure. For instance, you might have a four voice piece with parts labelled Cantus, Altus, Tenor and Bassus. In recorder terms this would almost certainly fit a classic quartet set up of descant, treble, tenor and bass recorders.

So what if a Renaissance composer wanted to write a five part piece? Easy – you add a fifth part and call it Quintus! Likewise, a sixth voice will often be labelled Sextus. Logically you might assume these parts would be added at the bottom of the score, but that would be too simple. Instead, composers simply inserted the additional voices where they thought they fitted best. In this Victoria Motet the Quintus part is the second line in the score, but in Anthony Holborne’s dances it’s the third line. Ultimately it doesn’t really matter – the crucial thing is to ensure you have the right size of recorder playing each line.

Before we consider who plays what, let’s now take a look at the information which often appears at the beginning of a score, as that contains some useful clues.

Be a musical detective

Given that part names don’t necessarily tell you which instrument you should play, you sometimes need to play detective to figure things out. There are two important pieces of information to consider here – clefs and instrument ranges.

If you look at a modern recorder quartet score (SATB) you’ll notice the clefs in the descant and bass parts have a small 8 above them. This means these instruments sound an octave higher than the printed pitch of the music. Treble and tenor recorders play at the printed pitch, so what you see is what you hear. If you check the clefs in the Victoria, the top and bottom lines lack these little 8s but instead they appear beneath the clefs of the Altus and Tenor lines – indicating the music here sounds an octave lower than printed. Don’t fret about this, but bear it in mind once you’ve followed the next clue.

The opening of the Victoria Motet, showing clefs, the pitch range of each part and the time signature

Now take a look at the two notes shown before the time signature – these show the lowest and highest pitches played by each voice. These give a big clue as to which instrument you’ll need to pick up. The Cantus line shows a range from the A below the stave, to the D a little over an octave higher. At first glance this range won’t fit on a descant or treble recorder, but don’t let that put you off! Now consider these notes an octave higher and you’ll find they fit perfectly on a treble recorder – low A to high D. If you do the same with the Quintus part you’ll find it also fits the range of a treble recorder. Looking now at the range of the Altus and Tenor parts, they fit the tenor recorder like a glove. The clef for these lines indicates the music should sound an octave lower than printed, but by using a tenor recorder you’ll negate the 8 symbol and, like the treble parts, you’ll be playing them an octave higher. Finally, the Bassus part fits the range of a bass recorder perfectly and the notes automatically sound an octave higher than notated.

When you pick a new piece of Renaissance music, take each voice, look at the range of notes and ask yourself which recorder best fits this range. Sometimes there may be a choice of two instruments which could work – for instance, descant or treble. In this situation you just need to decide whether the part would be more comfortable played low down on a descant or higher in the range of a treble – often there’s no absolute right answer here.

Before I move on, it’s worth noting that the lines best played on a treble recorder in Renaissance scores, like this one, will need to be played an octave higher than written. Sometimes the editor will be kind and provide separate parts which are written out at the correct playing pitch - as is the case with the Victoria. Not all editors are this helpful though, so it’s worth practising this skill ready for the occasion when you have to do it at sight in a rehearsal. I know many players find octave reading challenging, so it’s a technique I will return to in a future Score Lines blog post.

It begins like this….

The Latin word Incipit means ‘it begins’ and it also happens to be the name used for the information often shown at the start of a modern Renaissance edition. This gives a little glimpse of the notation the editor transcribed from the original source, be it the composer’s manuscript or a published edition from the period.

Take a look at the incipit from the Victoria and you’ll see the following pieces of information, from left to right:

The Incipit from our Victoria Motet

  • The original part names. Sometimes an editor will modernise these – here they’ve been retained unchanged.

  • The original clefs. Renaissance musicians must have been adept at playing from multiple C, G and F clefs. Today recorder players are most at home in treble and bass clefs, so editors will usually change these to suit our needs.

  • The original key signature. In the case of the Victoria, the piece was composed in one flat and the editor has transposed the pitch of the piece a fourth lower. Renaissance music will often transfer easily to recorders, but in some cases the music fits the instruments better when transposed up or down to a different pitch.

  • The composer’s time signature or mensuration sign – I’ll explain more about this momentarily.

  • The first few notes or rests of each part.

These pieces of information won’t always impact the way you play the music, but it’s interesting to see how the composer started the piece and to have a glimpse of Renaissance notational styles.

What pulse should I feel?

In modern music the time signature gives us a very clear idea of the rhythmic patterns within. The top number of a time signature tells us the number of beats in each bar, while the lower one indicates the type of beats (4 for crotchets, 8 for quavers, etc). Sometimes the letter C is used instead of a pair of numbers and I’ll explain why in a moment. Of course, it wasn’t until the mid-16th century that composers began to use bar lines and it wasn’t until the mid-17th century that our modern concept of barlines and time signatures became the norm.

Prior to the use of time signatures, composers included a mensuration sign, which indicated the underlying rhythmic patterns of the music, leaving performers to read the notes and figure out the shapes for themselves without the assistance of barlines. Modern editors often lend us a helping hand by converting this to a time signature and adding barlines to the music. These are a great crutch for those getting started with Renaissance music, but barlines often influence the way we play the music as we apply our modern concept of the first beat of each bar being the strongest. Playing from unbarred music can be strangely freeing, allowing you to judge the rhythmic patterns for what they are, without the constraint of barlines.

Many musicians are unaware of the direct connection between the old mensuration signs and modern time signatures so let’s take a look at that now.

The purpose of a mensuration sign was to help the performer understand whether the music was predominantly in two, three or four time. Music in three time was indicated by way of a circle, known as tempus perfectus - a reflection of the perfect Holy Trinity.

Music in four time was known as tempus imperfectus, and the simplest way of showing this was by way of an imperfect circle – one with a bit missing. Take a small chunk out of a circle and you’re left with a letter C – the symbol we still use today for common or four time! So how to show two time? Simple – cut your C in half with a vertical line and you have the symbol we use today for cut-common, or 2/2 time.

Our Victoria Motet has four minim beats in each bar, despite a time signature apparently indicating two….

Our Victoria Motet has four minim beats in each bar, despite a time signature apparently indicating two….

Now let’s take another look at the Victoria. The time signature is what we, as modern musicians, would consider to be 2/2 time. Look closer though and you’ll find four minims in each bar - not what we expect. Renaissance music is generally notated in very white notation – mostly minims and semibreves with very few black notes, such as crotchets and quavers. Once you bear this in mind, it then becomes evident that the time signature simply indicates two beats rather than two minims – on this occasion it’s actually two semibreve beats per bar. Of course, if you choose to continue feeling a minim pulse while playing you’re entirely at liberty to do so!

Notes and rests

Before I close, it’s perhaps also worth mentioning a few of the less frequently seen note and rest values which appear in Renaissance music.

Most recorder players are familiar with minim and semibreve notes and rests but if your comfort zone is the Baroque or beyond may not have encountered breves. A breve is twice as long as a semibreve (which literally means half a breve) and in most modern editions is indicated with a squarish shaped note. The equivalent length rest fills the space between two of the stave lines – as you can see in the first bar of the lower part in this example.

Minim, semibreve and breve rest symbols

A much less common note value in modern music is the longa, which appears as a breve with a stem. In Renaissance notation this can last twice or three times as long as a breve, depending on the prevailing pulse and pattern of beats. In practice, more often than not a longa will appear at the end of a piece (as it does in the last bar of the Victoria below) so it simply becomes a long note – the Renaissance equivalent of a pause, if you like.

The longa appears as a breve with a tail

What else would you like to know?

While this is by no means an exhaustive guide to Renaissance music and its notation, I hope it has perhaps answered some of your questions. Hopefully you’ll now be able to tackle new pieces with more confidence, selecting the right instruments for each voice and knowing how to interpret the time signatures and note lengths.

As far as I’m concerned, there’s no such thing as a stupid question. Next time you’re uncertain about some aspect of the music in a rehearsal, be brave and ask your question – you can be sure there’ll be someone else in the room who’ll be really grateful you piped up because they’re wondering about the same thing! In the meantime, I’d love to try and help you straight away, so do leave a comment below with your queries and I’ll do my best to have an answer for you. Just remember, no one knows absolutely everything about music, so look upon anything you don’t know as an opportunity to learn!


Looking for the latest in my Recorder Consort Music Downloads? Click here and you’ll find this week’s music and video - a quartet ‘minus one’ version of Alessandro Scarlatti’s Sonata in F for three treble recorders and continuo.